
If you want to install Docker on Ubuntu 24.04, you can set up the container platform with a few commands in the terminal, directly via the official Docker repository. Docker is one of the most widely used tools for running applications quickly and reproducibly. Instead of installing programs directly on the system, you run them in containers that contain all the necessary dependencies.
Step 1: Check system requirements
Before proceeding with the installation of Docker on Ubuntu 24.04, some basic requirements must be met. For Docker Engine, Docker officially supports Ubuntu 24.04 LTS in 64-bit version. Several architectures are compatible, including amd64 and arm64; the example below can be adapted to your architecture. Here are the other important prerequisites:
- User account with sudo rights: You need sudo rights to install packages, integrate repositories, and manage system services.
- Up to date system: Up-to-date packages reduce the risk of conflicts with old packages or missing dependencies.
- Stable Internet connection: you need an internet connection to download the necessary packages.
- RAM: Allow at least 1-2 GB of RAM for small containerized workloads with Docker under Ubuntu 24.04.
Virtual servers (VPS)
Cost-effective VPS on Dell Enterprise servers
-
1 Gbps bandwidth and unlimited traffic
-
99.99% availability and ISO certification
-
Award-winning 24/7 support and personal advisor
Step 2: Find the Right Server
If you want to install Docker on Ubuntu 24.04 not locally, but on a server, you must first choose the appropriate server type. For most projects, two variants are mainly considered: the virtual private server (VPS) and the dedicated server.
A VPS is particularly suitable if you want to achieve small to medium sized container projects. For example, it makes sense if you first learn Docker using a Docker tutorial, set up test environments, deploy web applications or operate individual services such as a web server, database or small monitoring system. A VPS is generally more cost-effective, quick to configure, and quite sufficient for many typical Docker scenarios. Its great advantage is that you can start with limited resources. For beginners in particular, the infrastructure remains relatively simple to manage.
A dedicated server is a better choice if your project requires significantly higher requirements for performance, isolation or continuously available resources. This is the case, for example, when several Docker containers are running simultaneously in production, large databases are used, many users access the applications or you need particularly consistent performance. The advantage of a dedicated server mainly lies in the fact that the hardware is reserved for you exclusively. You therefore do not share resources with other instances. As a result, performance and predictability are generally better in demanding scenarios. If you not only want to test Docker, but also want to integrate it sustainably as a fixed component of a production infrastructure, this type of server can prove profitable in the long term.


Step 3: Update the system
L’installing Docker on Ubuntu is carried out directly in the terminal. Start by updating your Ubuntu system to ensure that package lists are current and installed software is up to date. Use the following commands:
sudo apt update
sudo apt upgrade -y
bash
These commands are particularly important before a new installation, because they allow many sources of error to be ruled out in advance. After major system updates, it may also be a good idea to restart the server.
Step 4: Remove old or conflicting Docker packages
Before installing the official version of Docker, you must remove any old components. According to Docker, different packages may conflict with official packages. Run the command below to remove them:
sudo apt remove docker.io docker-doc docker-compose docker-compose-v2 podman-docker containerd runcbash
If some of these packages are not installed on your system, this is not a problem. Ubuntu then simply indicates that no packages should have been removed.
Step 5: Install the necessary packages for the repository
For Ubuntu to use the official Docker repository securely, you need a few auxiliary packages. These allow you to verify TLS certificates and correctly download signing keys.
sudo apt install ca-certificates curl -ybash
ca-certificates is necessary to verify the reliability of HTTPS connections. curl is used to download the Docker signing key. Without these components, the repository cannot be configured correctly.
Step 6: Configure Docker GPG Key
Start by creating the directory for the key file, then download the official Docker key.
sudo install -m 0755 -d /etc/apt/keyrings
sudo curl -fsSL https://download.docker.com/linux/ubuntu/gpg -o /etc/apt/keyrings/docker.asc
sudo chmod a+r /etc/apt/keyrings/docker.asc
bash
The GPG key is used to verify the origin of packets. Ubuntu uses it to check that packages come from a trusted Docker source. This step is important because it protects against tampered or manipulated packages.
Step 7: Add the official Docker repository
You will now configure the repository using a source file in Deb822 format. This format is favored by recent versions of Ubuntu. Start by creating the following file:
sudo nano /etc/apt/sources.list.d/docker.sourcesbash
In the example below, Architectures: amd64 corresponds to x86 64-bit systems. If you are using an arm64 system, change this value to Architectures: arm64otherwise APT will not find the Docker packages suitable for your architecture. Then insert the following content:
Types: deb
URIs: https://download.docker.com/linux/ubuntu
Suites: noble
Components: stable
Architectures: amd64
Signed-By: /etc/apt/keyrings/docker.asc
Save the file, then update the package lists:
Ubuntu now recognizes the Docker repository and makes the corresponding packages available for installation.
Step 8: Install Docker Engine
You can now proceed with the actual installation. For Ubuntu, Docker recommends installing Docker Engine with CLI, container runtime, Buildx, and Docker Compose plugin.
sudo apt install docker-ce docker-ce-cli containerd.io docker-buildx-plugin docker-compose-plugin -ybash
This is particularly convenient for beginners, because you can not only launch simple containers, but also later manage applications consisting of several services with Docker Compose.
Step 9: Verify that Docker is working correctly
After installation on Ubuntu, the Docker service normally starts automatically, but it is best to check its status immediately. Docker specifies, however, that this behavior may vary depending on the system configuration. So it is better to check the status of the service immediately.
sudo systemctl status dockerbash
If the service is running, you will see an output with the status « active (running) »:
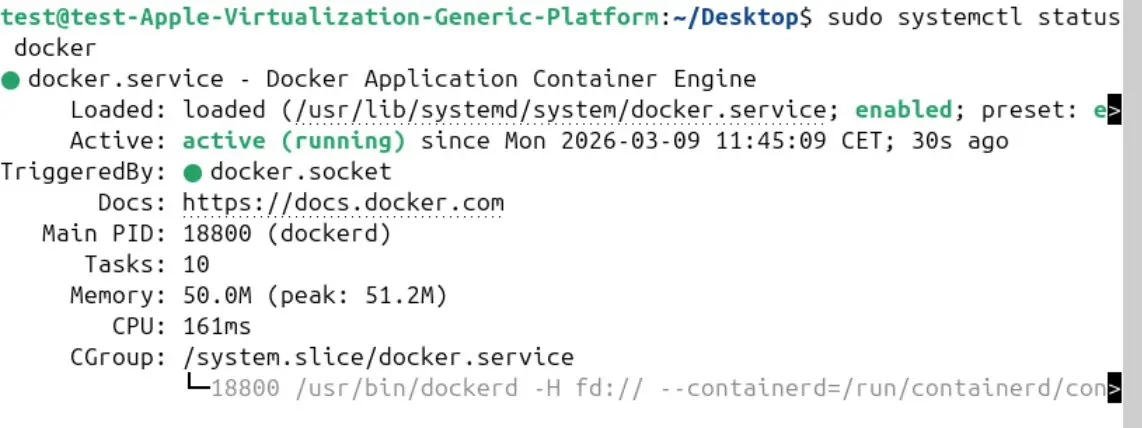
The status « active (running) » indicates that the Docker service is now running.
With qyou leave this view. You can also launch a test container:
sudo docker run hello-worldbash
If everything is configured correctly, Docker downloads the test image and starts a small container that displays a welcome message.
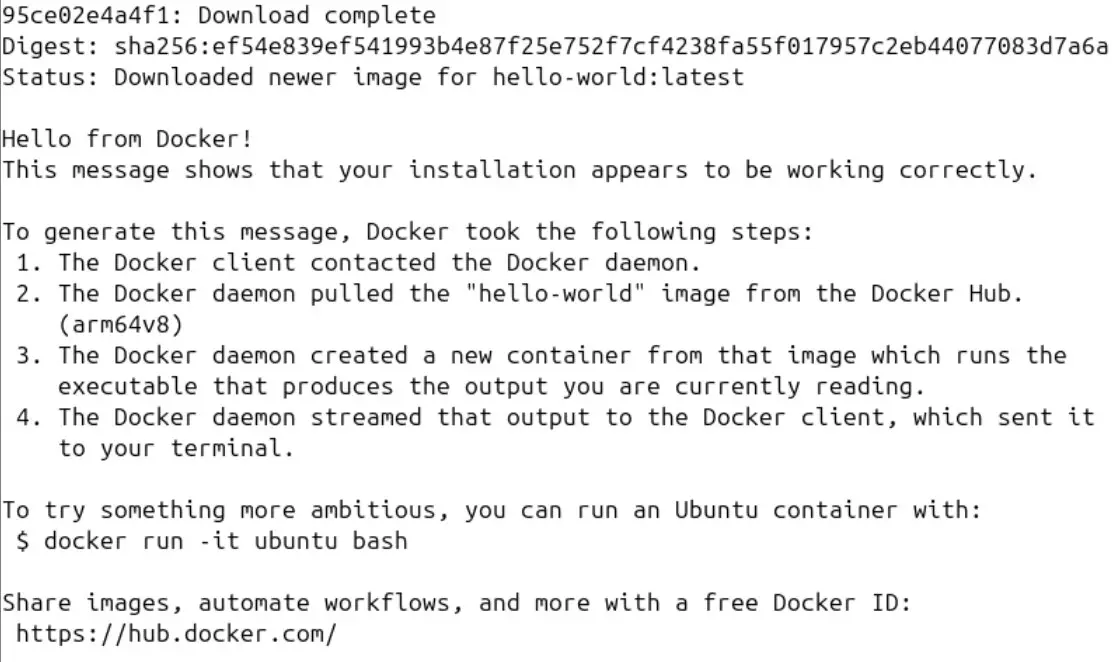
When you launch the test container, a welcome message is displayed to confirm that the installation was successful.
Step 10 (optional): Run Docker without sudo
By default, as a standard user, you do not access the Docker daemon directly. This is why commands first start with sudo. You can change this through a named user group docker. Note, however, that members of this group obtain extended rights. If the group doesn’t exist yet, create it first:
Next, add your user:
sudo usermod -aG docker $USERbash
Disconnect then reconnect so that the group modification is taken into account. You can then execute, for example, docker ps Or docker run hello-world without sudo.
Note
For beginners, this option is convenient, but it must be used knowingly. The Docker documentation explicitly points out that the group docker grants permissions similar to those of root. For security reasons, you should therefore only perform this step if you really need it.