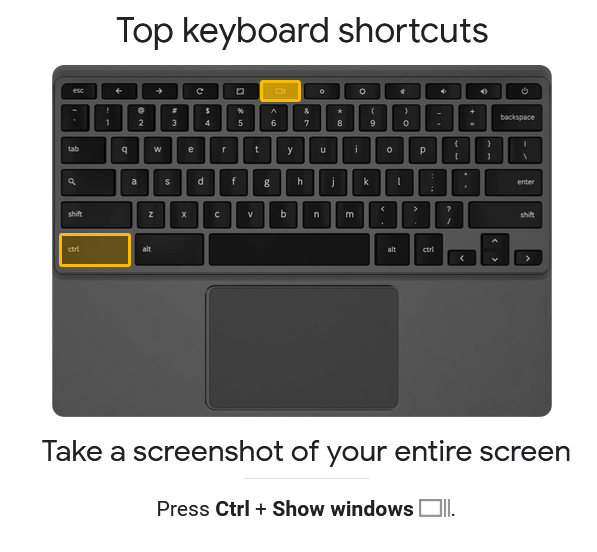
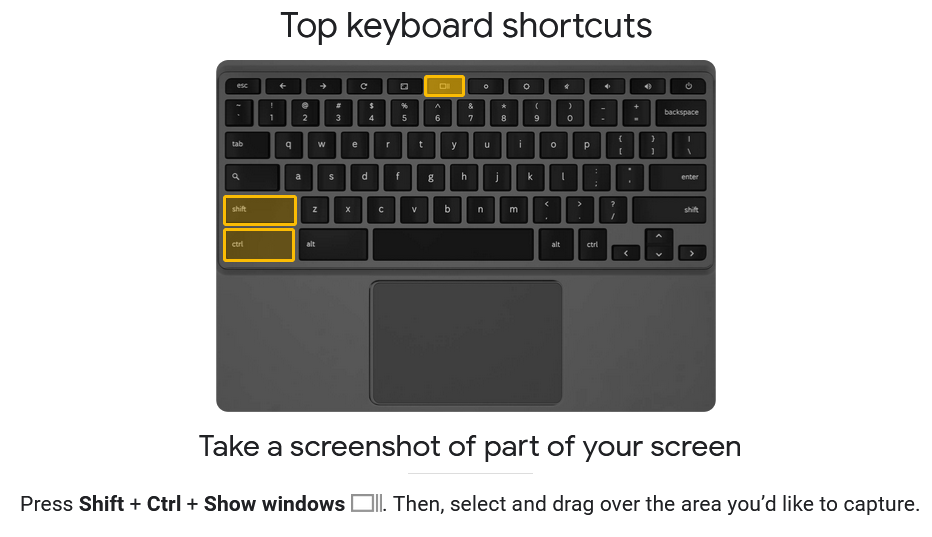
In Windows, just use the shortcut [Windows] + [Impr. écran] to take a screenshot. But this is not the case with Chromebook: you will have to learn the shortcut [Ctrl] + [Afficher les fenêtres] for a full screenshot or [Ctrl] + [Maj] + [Afficher les fenêtres] for a partial screenshot.
How to Take a Chromebook Screenshot
Chromebooks come with Google’s Chrome OS operating system. Typical Windows and Mac apps therefore don’t work on Chromebooks, which has its pros and cons. Chromebooks come preinstalled with popular Google apps like Chrome Browser, Gmail, Google Calendar, Google Maps, Google Docs, and Google Meet. Added to this is cloud memory thanks to Google Drive and its 5 GB of free storage space. Due to their minimal configuration, the Chromebooks are designed for online and cloud services ; they certainly offer very smooth performance, but also require a period of adaptation. The same goes for taking screenshots.
So, to take a screenshot on Windows 11, you use the shortcut [Windows] + [Impr. écran]. If you want to screenshot on Mac, you do [Shift] + [Cmd] + [3]. On the Chromebook, there are also specific key combinations.
Follow these steps to take a screenshot of the Chromebook:
Full screenshot
Step 1 : Press on [Ctrl] + [Afficher les fenêtres]. The key [Afficher les fenêtres] sits on the top row of the Chromebook’s keyboard and can be identified by a window-shaped symbol with two side lines. If you’re using a Windows keyboard with the Chromebook, press [Ctrl] + [F5].
2nd step : Chrome OS now takes a screenshot of the entire screen and drops it into the default « Downloads » location.

Partial screenshot
Step 1 : to push on [Ctrl] + [Maj] + [Afficher les fenêtres].
2nd step : the slider allows you to set screen area you want to save. In some cases, a menu opens in which you must first select « Screenshot », then the options for full, partial or window screenshots.
Step 3: once the screenshot has been taken, you will find it in the default « Downloads » location.

Make a screen recording
Step 1 : if you want to record a video of your screen, tap the shortcut [Ctrl] + [Maj] + [Afficher les fenêtres] and select the “Record Screen” option.
2nd step : you can choose to record the whole screen, a part only or an open window.
Step 3: as soon as you end the recording by clicking on « Stop », it is deposited in the standard location.
Save screenshots
The “Downloads” folder on your Chromebook is used default storage location for screenshots and screen recordings. To change this or to search for screenshots and recordings in a targeted way, tap [Ctrl] + [Maj] + [Afficher les fenêtres]. Then go to “Settings” (the gear icon) and “Select Folder”. Now choose where you want to automatically save your recordings.
You’ll have to do it differently if you want to take screenshots on Chrome. To do this, use the standard screenshot shortcuts of Windows, Mac and Chromebook. Screenshot extensions for Chrome, like the Chrome Capture Tool, are also useful for this purpose.


