The open world survival game The Isle has been updated with a new version: The Isle Evrima. As this is an exclusively multiplayer game, it is interesting to set up your own server, which is done in just a few steps on Linux.
System requirements for a The Isle Evrima server
To set up a The Isle Evrima server, your system must meet certain minimum requirements, particularly regarding RAM. This way you can ensure in advance that the server installation will go smoothly.
- Processor : You should use at least a quad-core processor here.
- RAM : For your The Isle Evrima server, you need at least 8 GB of RAM.
- Hard disk : A certain amount of free space is required. For Ubuntu, around 30 GB is enough, while a Windows server requires at least 70 GB.
- Internet connection : A stable Internet connection with a bandwidth of around 10 Mbps ensures that no latency negatively affects your gaming experience. For professional server providers, this speed poses no problem.
- Operating system : The recommended operating system for the server is a Linux distribution. For the instructions shown here, we are using Ubuntu. In principle, you can also use Windows Server, but the configuration will then differ from the one shown here.
What type of server for The Isle Evrima?
It exists different servers which you can opt for when hosting your The Isle Evrima server. Choosing the right server depends on your needs and requirements. We can distinguish the following servers:
- Cloud Server : a Cloud server uses virtualized resources and can be adapted very flexibly at any time.
- vServer : VPS also rely on the use of virtualized resources.
- Dedicated server : with dedicated servers, all resources used are exclusively reserved for your use.
Five scenarios for The Isle Evrima and the most suitable servers
Choosing the server that suits you best depends in particular on your gaming habits and the number of players. To help you make your choice, we have provided you with a summary table of the different scenarios and the corresponding servers:
| Possible scenarios of The Isle Evrima servers | Recommended IONOS servers |
|---|---|
| Up to 50 players, occasionally online | RL Cloud Server |
| Up to 50 players, always online | VPS Linux L |
| Up to 100 players, occasionally online | RXL Cloud Server |
| Up to 100 players, online all the time | VPS Linux XL |
| For more than 100 players, permanently online | XXL Linux VPS |
The server we recommend for getting started in hosting
To start, the quality/price ratio of Cloud servers is almost unbeatable. Due to their excellent scalability, you can’t go wrong with hosting a Cloud server: are you playing more than expected or want to increase the number of players? All this is no problem: just increase your server performance flexibly!
Step-by-step instructions for setting up your The Isle Evrima server
Setting up your server can be done in just ten steps, similar to setting up a The Isle server.
Step 1: Connect to your server
First of all, it is necessary to establish a connection with your server. Typically, the SSH protocol is used for this purpose.
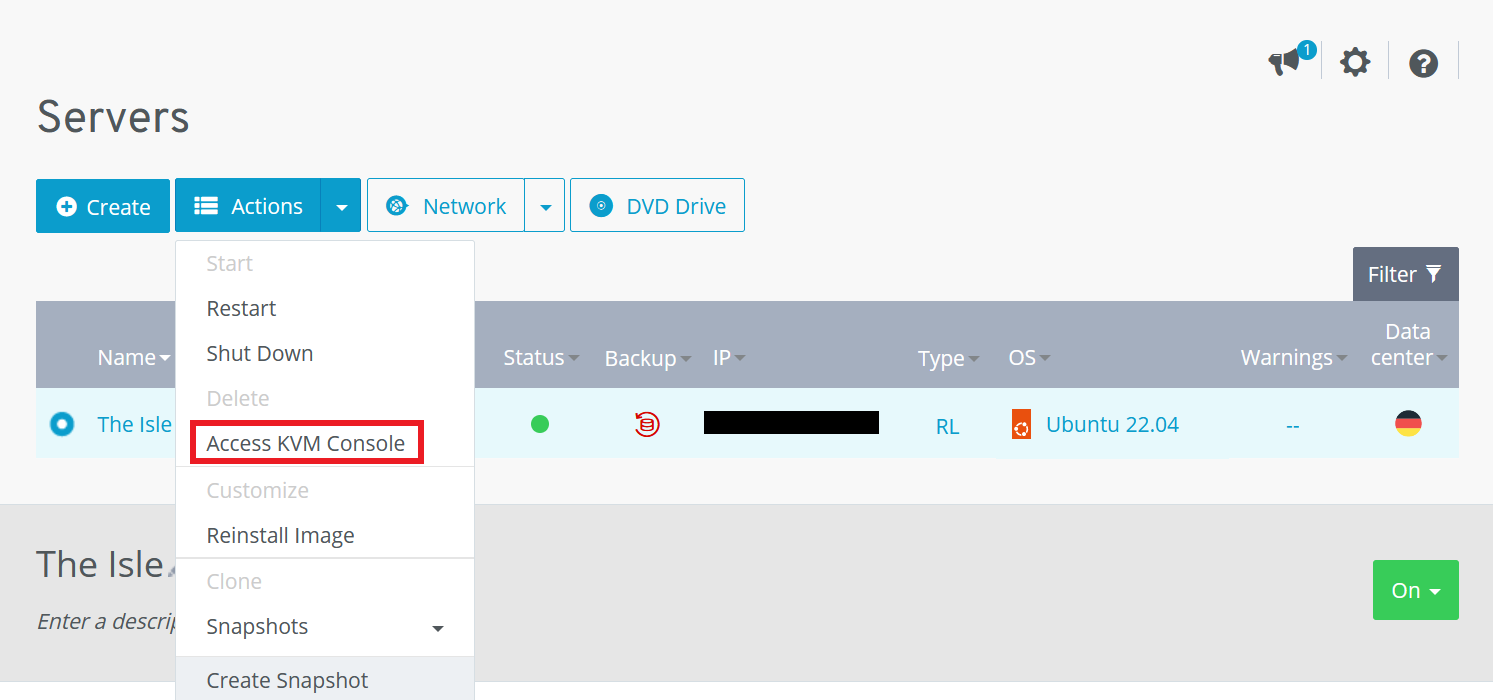
By choosing an IONOS server, you also have the KVM consolewhich you can also use to log in using the following instructions:
- Log in to IONOS with your personal login details.
- Click on Servers & Cloud and access the server menu.
- Select your server from the list.
- Click on the corresponding server entry and select from the drop-down menu ActionsThen Start KVM console.
- Log in with the access data you can find in the Cloud Panel under Access data.

Step 2: Create a new user
Once the connection with your server is established, the second step is to create a user account. In this example, we chose the name island, in accordance with the game. However, you can choose any name. Note, however, that you will then have to adapt the commands presented here accordingly.
sudo adduser isle
sudo usermod -aG sudo isle
su – isle
bash
Step 3: Install SteamCMD
SteamCMD is thecommand line version of the Steam client which will greatly facilitate your server configuration. To install it, you must first carry out any system updates:
sudo apt update
sudo apt upgrade
bash
We then download the SteamCMD libraries and create the necessary folders. To do this, the following terminal commands can be used:
sudo add-apt-repository multiverse
sudo dpkg --add-architecture i386
sudo apt update
sudo apt install lib32gcc1 lib32stdc++6 libc6-i386 libcurl4-gnutls-dev:i386 libsdl2-2.0-0:i386
cd ~
mkdir steamcmd
mkdir isle
curl -sSL -o steamcmd.tar.gz https://steamcdn-a.akamaihd.net/client/installer/steamcmd_linux.tar.gz
tar -xzvf steamcmd.tar.gz -C steamcmd
cd steamcmd
bash
Step 4: Open SteamCMD
Steam should now be successfully installed on your system. The following command can now be used to start SteamCMD:
sudo chmod +x steamcmd.sh
./steamcmd.sh
bash
Step 5: Install The Isle Evrima
In this step, you can finally start installing The Isle Evrima. To do this, run the following commands:
Steam>force_install_dir /home/isle/isle
Steam>login anonymous
Steam>app_update 412680 -beta evrima +quit
Steam>exit
bash
Step 6: Move the Steamclient to the appropriate folder
As The Isle Evrima server will search for the Steamclient in a specific folder, you must first move it to the folder in question. To do this, you must first create the directory, then move the correct file to the new folder:
mkdir /home/isle/.steam/sdk64
mv /home/isle/steamcmd/linux64/steamclient.so /home/theisle/.steam/sdk64/steamclient.so
bash
Step 7: Download Configuration Files
For configuring your server, you need some configuration files which you can easily download on GitHub. First, however, you should create a few folders in which you can place the configuration files:
mkdir /home/isle/isle /TheIsle/Saved
mkdir /home/isle/isle/TheIsle/Saved/Config
mkdir /home/isle/isle/TheIsle/Saved/Config/LinuxServer
bash
After creating the folder, navigate to the folder LinuxServer. In this folder, you can download the necessary configuration files using the following commands:
cd /home/isle/isle/TheIsle/Saved/Config/LinuxServer
wget https://raw.githubusercontent.com/modernham/The-Isle-Evrima-Server-Tools/main/Engine.ini
wget https://raw.githubusercontent.com/modernham/The-Isle-Evrima-Server-Tools/main/Game.ini
bash
Step 8: Edit Configuration Files
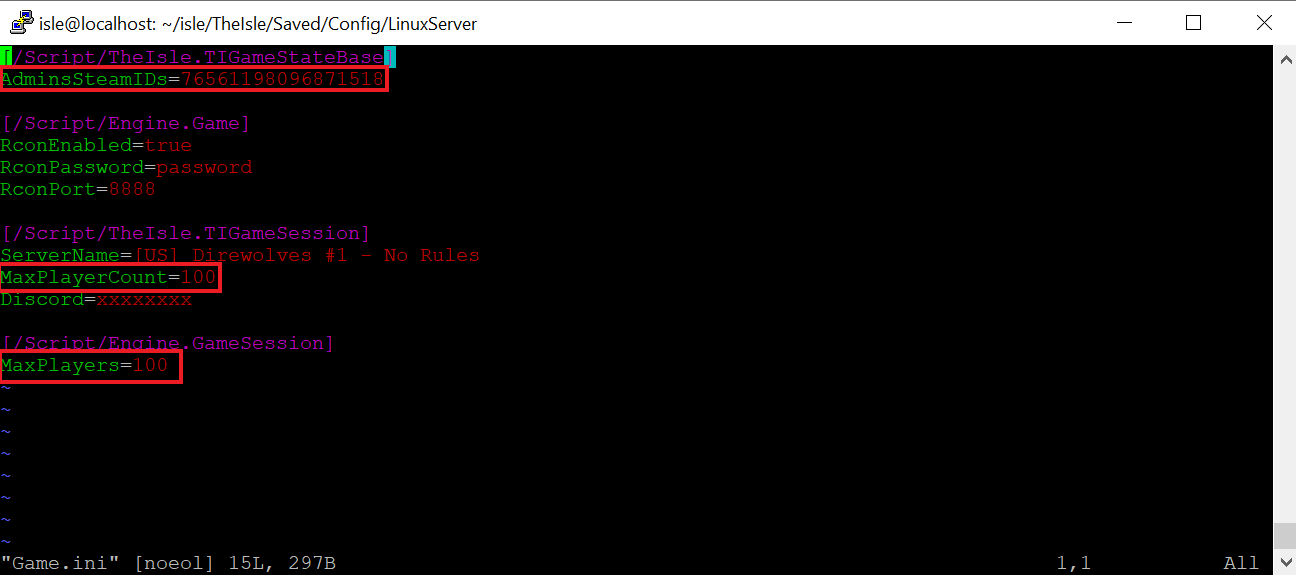
To edit configuration files and adapt them to your preferences, you can use thetext editor of your choice. We chose to use vim, because the text editor is already preinstalled and can be called directly in the terminal. It is therefore simply used via the command line. The file to be processed is named Game.ini and contains important configuration settings. It can be opened and edited with vim using the following command:
In addition to your SteamID, which you will find in the “ Account details » from Steam, you must also indicate the number of players who can join your The Isle Evrima server. Additionally, you can set the RCON password in the file Game.inior renounce the use of the password by defining RconEnabled:false.

Step 9: Start The Isle Evrima Server
Now you can finally start your own The Isle Evrima server! To do this, you must first access the folder concerned:
In this last step, you can start your server by entering the command shown below in your terminal. Be sure to replace [Adresse IP] by your own IP address.
./TheIsleServer.sh MultiHome=[Adresse IP]?Port=7777?QueryPort=7778 -logbash
Step 10: Connect to the Server
After successfully setting up your server, you and your teammates can now connect to it! To do this, simply open the game and enter the data from The Isle Evrima server that you have just created into the search window. First make sure that you have installed the Evrima branch on Steam. Now is the time to step into the shoes of a dinosaur!


