You can install Composer PHP package manager on Ubuntu 20.04 in few steps. The installation can be done under Linux distribution in the terminal.
Install PHP Composer
Installing Composer on Ubuntu 20.04 only takes a few minutes. Only your linux terminal is required for installation.
If you are using an operating system other than Ubuntu 20.04, the following articles tell you what to do:
Step 1: Update the system
Before you jump into installing Composer on Ubuntu, make sure your system is up to date. Open the terminal and run the following command line commands:
sudo apt update
sudo apt upgrade
bash
You will then be prompted for your password, as the commands above must be run with root-level access rights.
Step 2: Install required packages
Once you have updated your system, you can install required packages for PHP Composer. This includes among others the PHP command line interface and the curl command line program. If you have already installed the required packages on your system, you can skip this step. Otherwise, you can use this command to start the installation:
sudo apt install curl php-cli php-mbstring git unzipbash
Step 3: Download and Install PHP Composer
Even for installing Composer on Ubuntu 20.04 per se, one command is enough. This invokes thecurl tool which has just been downloaded to get the required PHP Composer installation files from the official website. PHP Composer is then installed on your system.
curl -sS https://getcomposer.org/installer | sudo php -- --install-dir=/usr/local/bin --filename=composerbash
Once Composer is installed, the following message should appear on your terminal to let you know that the installation was completed successfully:

Step 4: Verify Installation
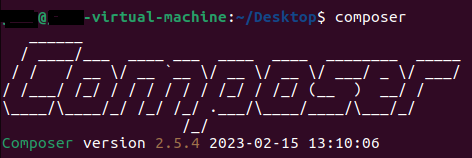
To finish, you must check again manually installing Composer by entering the following command:
You should then see in the terminal a list of the main Composer commands along with your current Composer version:

If there are problems running PHP Composer on your system, it may be because the folder where you installed PHP Composer (usr/local/bin) is not included in your $PATH environment variable.
With web hosting from IONOS, you get built-in DDoS protection. Additionally, current PHP versions such as PHP 8 are supported.
Using PHP Composer
Once the package manager is installed, you can start using the tool and add dependencies to your projects.
Create a composer.json file
The file composer.json is the file in which you write the dependencies of your PHP project. You can create the file manually or configure it automatically when you create your first dependency. If you want to set detailed settings for the file composer.jsonit is recommended to turn to manual creation using the Compose command:
Add dependencies
The essential purpose of PHP Composer is to create and manage dependencies in your project. You only need one command to add such dependencies:
composer require monolog/monologbash
The sample code above is to add the Monolog logging library as a dependency to your project.
Update dependencies
You can also use PHP Composer to update the dependencies of your project using the following command:


