If you don’t like the default look of your Outlook inbox, simply customize it. We show you how you can easily change your Outlook view.
Quick overview of settings to change Outlook display:
- Change views of Outlook Inbox, Calendar, Contacts, and Tasks using the ribbon on the “View” tab and under the “View” item. Display settings “.
- Additional configuration options for your Office theme can be found under “File” > “Office Account” > “Office Theme”as well as in the “reading pane” of the menu ribbon.
To change the Outlook display: important settings
If you set Outlook as your default email client, you have access to Outlook themes and rules that allow you to customize Outlook’s display. OUR guide to customizing your email service is based on Microsoft 365, but can be applied almost identically to Outlook 2021, 2019 and 2016.
Viewing emails
When you open Outlook, you automatically see the classic view with an overview of current emails and various menu and navigation items. These specific elements can be configured in just a few clicks. Here are a few :
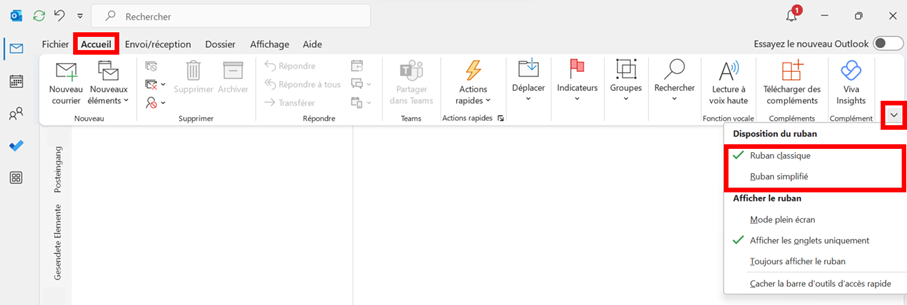
- Menu ribbon: Here you will find the essential functions for composing, deleting or forwarding emails. Click the arrow icon on the right side of the ribbon to open the context menu. You can choose between the “classic ribbon” and “simplified ribbon”. The classic presentation is the default display. Simplified View “collapses” the ribbon, making it appear as a simplified context menu.

- Display settings: You will find the “View” tab above the ribbon. Here click on the “Display Settings” sub-item to open the advanced configuration options. There you will find a list of descriptions such as “Columns”, “Group by” or “Sort”. Under “Columns,” you can organize your email inbox into columns grouped by categories, such as “Sent,” “Read,” “Task Subject,” or “Show Finish Date.” You will find more practical options under the display setting ” Conditional formatting “. This allows you to set, among other things, the font, font size and color of unread, late or expired emails.

- Folders or navigation pane: On the left side of your inbox you will find the folders or navigation pane. This includes created and default folders and email accounts. As with the ribbon, you will find an arrow in the top menu area. Click on it to expand the folder pane. In reduced form, only a narrow bar is visible as a context menu.
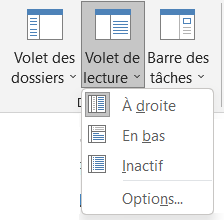
- Reading pane: in “View” > “Layout”, you will find the element “Reading Pane”. You can configure how you want to see messages in the reading pane. Possible settings are “Right”, “Bottom” or “Inactive”.

Calendar view
Effective task planning requires a clear schedule. Outlook provides the following options for customizing the calendar view:
- Quick navigation with the key [Alt] : you can use key combination [Alt] + digits of [1] has [9] to display a selected number of days in the Outlook calendar. For example, tap [Alt] + [3] to display only three days at a time.
- View the calendar in days and weeks: You can view the current calendar in day, week and month views or as a workweek using the corresponding menu items in the “Home” tab.
- Multiple calendars at the same time: you can display several calendars at the same time or one above the other with the option “ My calendars “. Simply check the calendars required for this purpose. To view one calendar within another, click the arrow next to the calendar name.
- View tasks in calendar: Tasks and calendars are closely related, so tasks can be displayed in the calendar. To do this, go to the “ Daily To-Do List » in “View” > “Layout”. However, it is only accessible for the Day and Week views of the Outlook calendar.
Viewing contacts
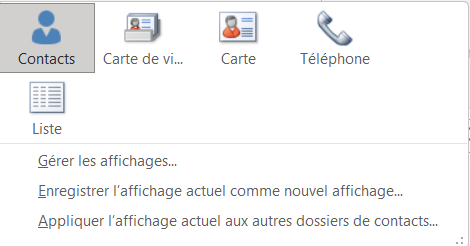
Especially for Outlook accounts with a large number of contacts, the individual view can be confusing. The contact display will be better organized by applying settings such as “Business Card” or “Map”. You will find them in the “Home” tab under “Change display”. Contacts are clearly listed in alphabetical order. It is also possible to customize the sorting rule.

Viewing Tasks
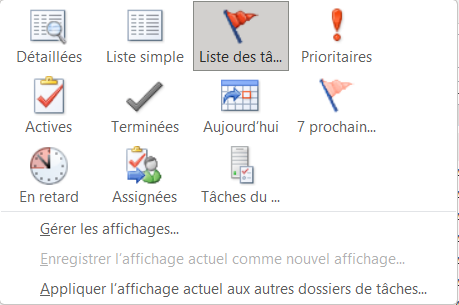
Once in the task pane, switch to the “View” tab and navigate to “ Change display “. There you specify how your tasks should be displayed. This is a simple default list. You can select the following other views:
- Detailed
- Priority
- Completed
- Next 7 days
- Late

IONOS offers Hosted Microsoft Exchange and Microsoft 365 groupware solutions with the Microsoft all-in-one package for businesses for which secure network collaboration is a priority.
Other settings for Outlook display
In addition to the main settings for customizing an Outlook view, Microsoft’s email service offers you many other detailed configurations. We offer you a brief overview of the main points:
Use Outlook in Dark Mode
Dark mode is a standard feature in most Outlook apps and alternatives. To also enable night mode in Outlook, go to “File” > “Office Account” > “Office Theme”. Here you specify the desired dark mode with “Dark Gray” or “Black”.
Change message font
If you want to change Outlook’s default font and set a custom font size for messages, go to “File” > “Options” > “Mail” > “Stationery and Fonts”. There you set the default font, font color and font size of your messages.
Custom display
Instead of customizing existing default Outlook views, you can also configure a new view. To do this, go to the “View” tab and “Change Display”. Then select “Manage displays”, and finally on the “New” option. You can now name your new view and choose from view types such as Table, Timeline, Map, or Contacts.
Display density
Display density helps determine how many messages and what part of the message you see in the inbox. To do this, go to the “Display” tab and, in the “Layout” area, select the display density based on the following points, as needed:
- Complete : message preview with sender image, attachments and message text (subject, part of first line, sender)
- AVERAGE : preview text with spacing between messages
- Compact: minimal spacing with preview text


