OneDrive is Microsoft’s cloud service, so it comes pre-installed in Windows. If you don’t want to use OneDrive, you can easily disable or uninstall this service.
Follow these steps to disable OneDrive in Windows 10:
- Look for the OneDrive symbol (a cloud) in your taskbar and double-click it.
- The symbol may be hidden. In this case, click on the arrow symbol in the taskbar until you reach the OneDrive symbol.
- Click on the gear wheel and select the tab Settings in the drop-down menu.
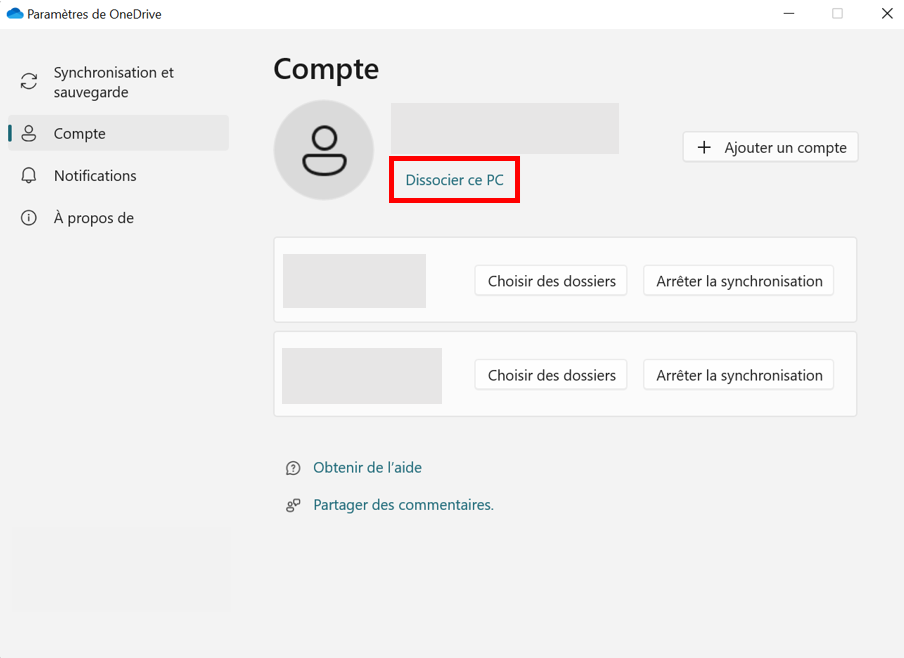
- Select the Account tab and click on the item » Unlink this PC « .
Disabling OneDrive can be useful for a variety of reasons. In particular, you can disable OneDrive auto-sync and auto-launch so that only you decide which files are synchronized and when. If you already using another cloud account and are therefore not dependent on the synchronization of your data in OneDrive, deactivating the Microsoft cloud service can also be wise.
Disable OneDrive in Windows 10/11
If you want to deactivate OneDrive in Windows 10 or 11, there are several ways. For example, you can prevent data synchronization with OneDrive or disable the automatic launch of the program when your computer starts. The most common way to deactivate OneDrive, however, is to remove the link to your pc. This procedure takes place in a few steps.
Step 1: open OneDrive
Open OneDrive by clicking the cloud-shaped OneDrive symbol in the taskbar. You can also type “OneDrive” in the search bar to access the program.
Step 2: Access Account Settings
Once OneDrive is open, go to account settings by clicking on the tab Settings. In the sidebar, then select » Account to open account settings.
Step 3: Disable OneDrive
The last step to deactivate OneDrive is to remove the link between your computer and OneDrive by clicking on the corresponding button.

Uninstall OneDrive in Windows 10/11
If you have already deactivated OneDrive and no longer want to use this cloud service, you can uninstall OneDrive. The data you have saved in OneDrive so far will not be lost, but can be viewed on the web at any time. Uninstalling the program is simple and contains few steps.
Step 1: Go to Settings
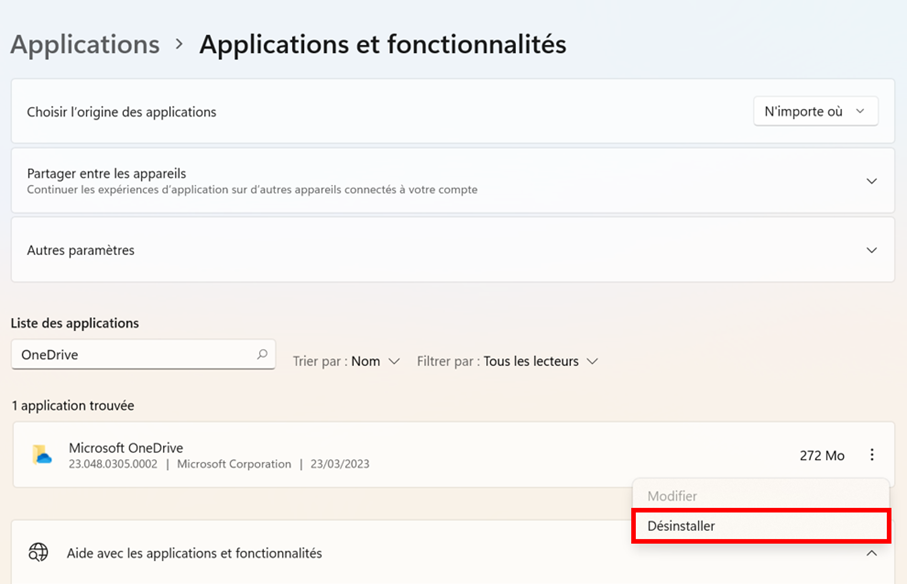
In the search bar, type “Programs” and select the option “ Add or remove programs « . This gives you direct access to the settings and in particular to the “Applications and features” section. You can also access this section manually.
Step 2: Find OneDrive
Search for OneDrive using the search bar in your settings.
Step 3: Uninstall OneDrive
When you find it, click on « Microsoft OneDrive », then on the » Uninstall to remove the program from your computer. You must then confirm the uninstallation of the program.

Uninstall OneDrive on an Android smartphone
OneDrive can also be used on smartphones. If you want to disable or uninstall OneDrive on Android, you can do so easily in your smartphone settings.
To do this, go to the settings and then to the section » Storage « . Select OneDrive and press the » Uninstall to remove the app from your Android smartphone.


