For change the appearance of your website, you can use templates in the frontend. With the Joomla CMS, it is possible to create your own templates to be able to personalize them according to your wishes. Find out how to do this later in this article.
Create a Joomla template: prerequisites
Customizing your website with Joomla is not very complicated. In fact, you only need three elements to create your own Joomla template:
- Joomla installation, minimum version 3.9: you need a current version of the CMS. All versions from version 2018 of Joomla 3.9.x are suitable for creating your own templates.
- Basic knowledge of HTML and PHP: To be able to follow the instructions you need basic knowledge of HTML and PHP.
- CSS knowledge: For web design, CSS is necessary. Our CSS tutorial gives you a good introduction to cascading style sheets. You must also master the main CSS commands if you want to create a Joomla template.
Create a Joomla template step by step
If you meet the conditions above, you can start creating your own template! To do this, log in to your Joomla site and then follow our step-by-step instructions.
Step 1: Create a Folder Structure
Firstly, you need to create the folder structure required for your template. This is done in just a few clicks. To do this, first navigate to the “templates” folder that you will find in the Joomla installation folder. All your templates are listed there. Create a new folder and name it. In this example, we create a folder named “test”, where the template will then be placed.
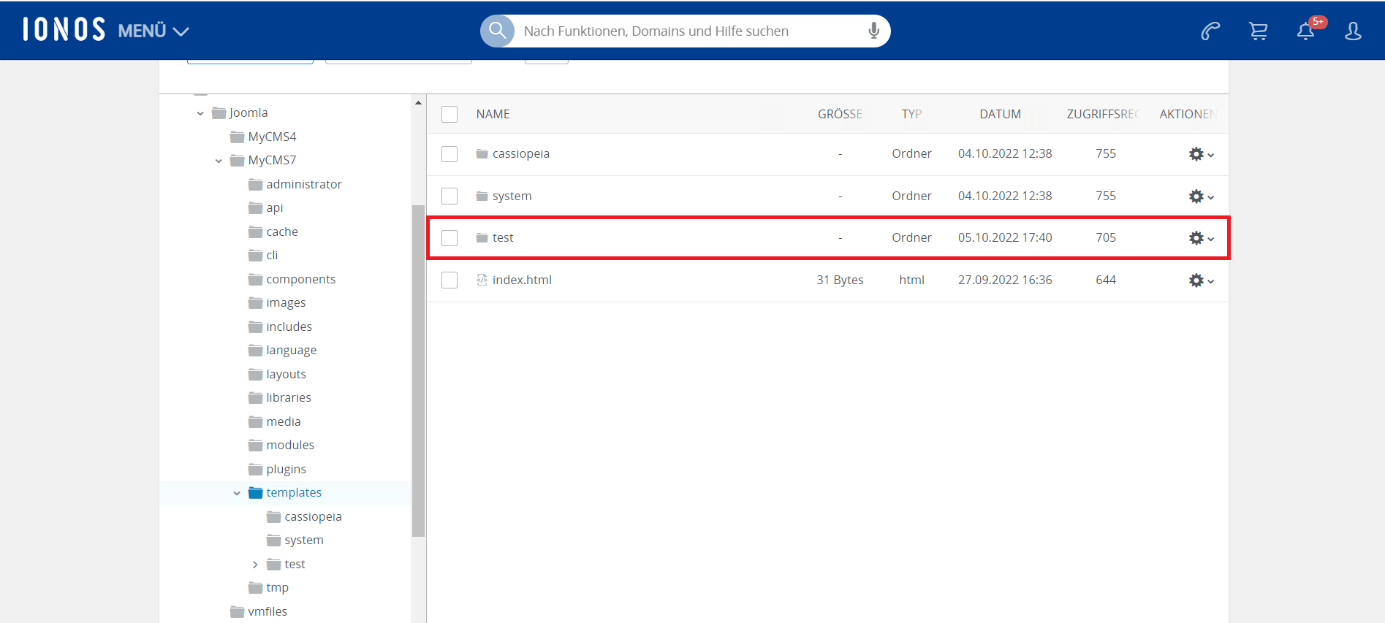
To complete the folder structure, you must create all the files necessary for the template. The code is based on a example template :
templateDetails.xml
You must first create the file that allows you to install a template in Joomla: the manifest file templateDetails.xml. In this file, you define all the basic information about your template. This is for example the name of your template or its author.
You don’t need to be an Extensible Markup Language (XML) professional to understand the lines of code in the file. THE tags The most important ones of the XML file are the following:
-
<name>: template name -
<creationDate>: date of creation of the template -
<author>: author of the template, i.e. your name -
<authorEmail>: email address of the author, therefore yours -
<authorUrl>: URL of your website -
<copyright>: copyright holder of the template -
<license>: license information -
<version>: current version of the template -
<description>: template description -
<files>: all files to install with the template -
<positions>: positions of the modules used in the template
<?xml version="1.0" encoding="utf-8"?>
<!DOCTYPE install PUBLIC "-//Joomla! 2.5//DTD template 1.0//EN" "https://www.joomla.org/xml/dtd/2.5/template-install.dtd">
<extension version="3.1" type="template" client="site">
<name>test</name>
<version>1.0</version>
<creationDate>19.10.2022</creationDate>
<author>Musteruser</author>
<description>IONOS Joomla Test Template</description>
<files>
<filename>index.php</filename>
<filename>templateDetails.xml</filename>
<filename>template_preview.png</filename>
<filename>template_thumbnail.png</filename>
<filename>favicon.ico</filename>
<folder>css</folder>
</files>
<positions>
<position>menu</position>
<position>aside</position>
<position>footer</position>
</positions>
</extension>
xml
index.php
The file index.php is where the basic mockup of your entire website. Firstly, simply use a simple HTML skeleton :
<!DOCTYPE html>
<html lang="fr" dir="ltr">
<head>
<meta name="viewport" content="width=device-width, initial-scale=1.0" />
<!—Données de l’en-tête-->
</head>
<body>
<div id="navbar">
              <nav>
<ul>
<li><a href="#">Catégorie 1</a></li>
<li><a href="#">Catégorie 2</a></li>
<li><a href="#">Catégorie 3</a></li>
<li><a href="#">Catégorie 4</a></li>
</ul>
              </nav>
          </div>
          <div id="content">
<h1 id="heading">Test-Template</h1>
<img class="image" src="https://picsum.photos/900/500" alt="Image"/>
<p>Vous pouvez créer un template Joomla en quelques étapes seulement. Suivez simplement les instructions étape par étape de IONOS.
</p>
          </div>


        <footer id="copyright">
          <div id="footercontent">
<p>Copyright by IONOS</p>
          </div>
</footer>
</body>
</html>
html
css folder and template.css
Then create a folder called “css” which will contain all the files that will be important for the design of your template. In this folder, you directly create the file template.csswhere you can specify by code the layout you want.
body {
font-family: "Arial", serif;
color: black;
line-height: 150%;
}

#navbar ul {
  list-style-type: none;
  margin: 0;
  padding: 0;
  overflow: hidden;
  background-color: #003399;
}

#navbar li {
  float: left;
}

#navbar li a {
  display: block;
  font-size: 26px;
  color: white;
  text-align: center;
  padding: 16px 18px;
  text-decoration: none;
}

#navbar li a:hover {
  background-color: white;
  color: #003399;
}

#heading {
  font-size: 48px;
  color:  #003399;
  text-shadow: 0 0 5px #000099;
}

#footercontent {
  float: right;
  padding-right: 10%;
}
css

Step 2: install the template
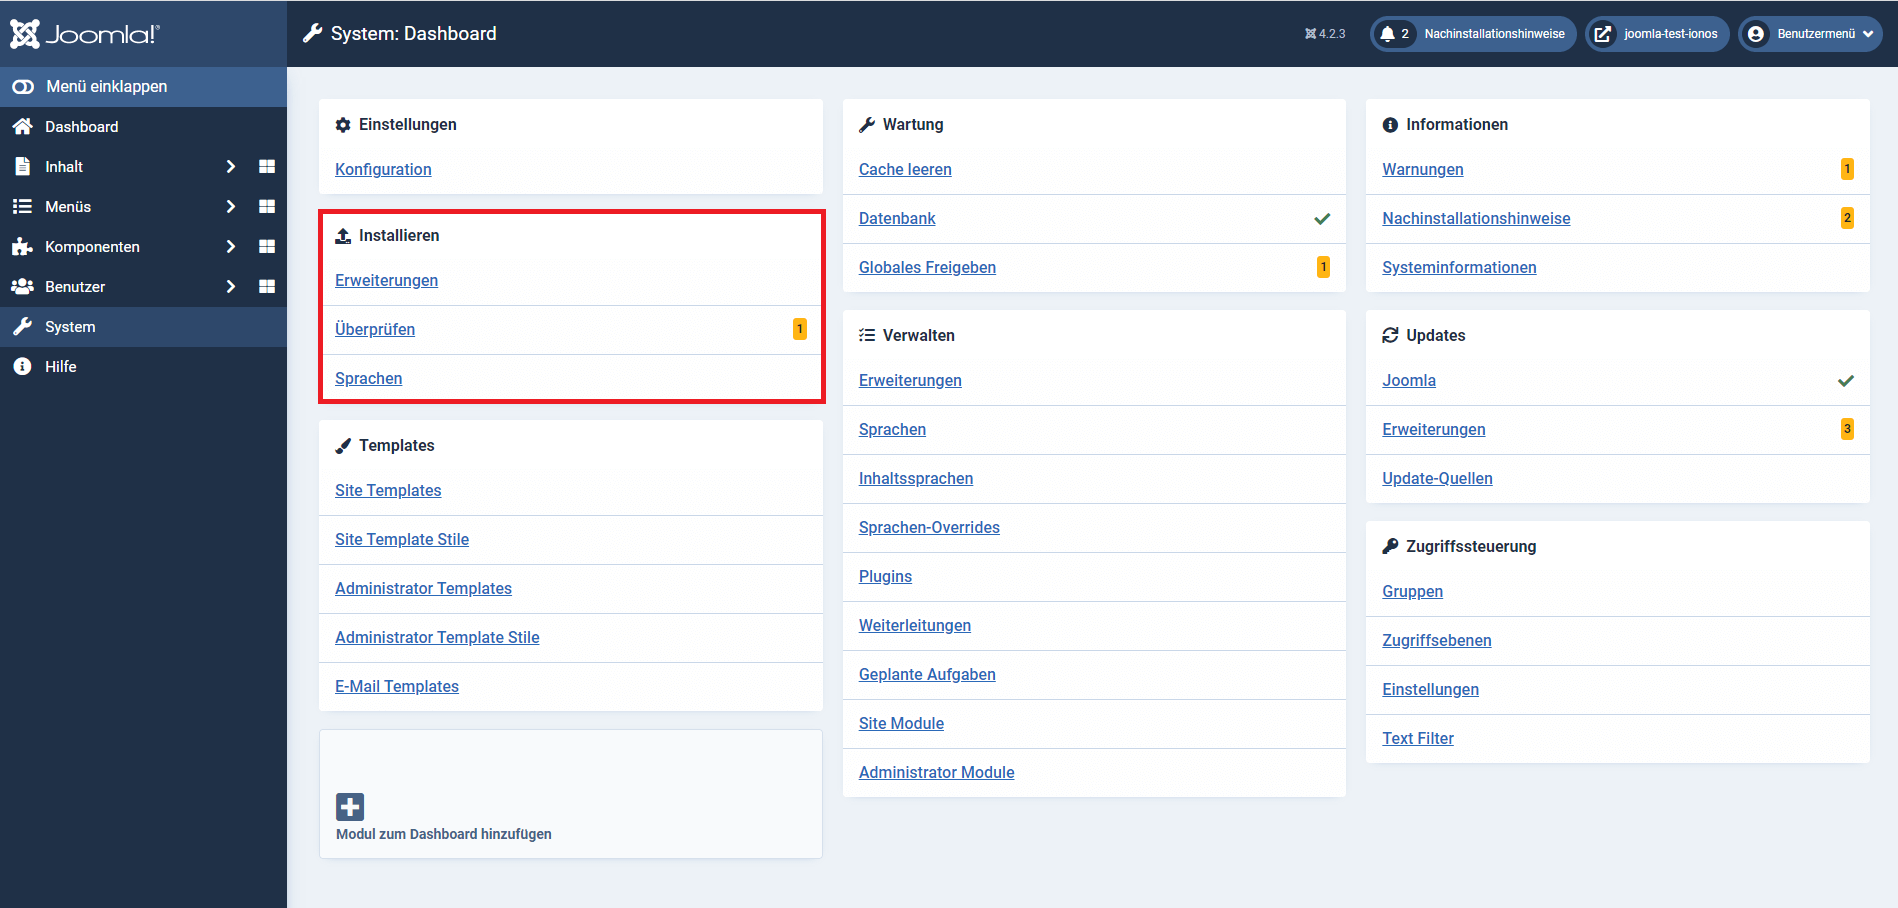
The second step is to install the template you just created. To do this, go to the Joomla backend under “ System > Install > Verify “. In the preview there, you should find your template under the name you chose. By clicking on the box to the left of your template name, you can install the Joomla template.

Step 3: activate the template
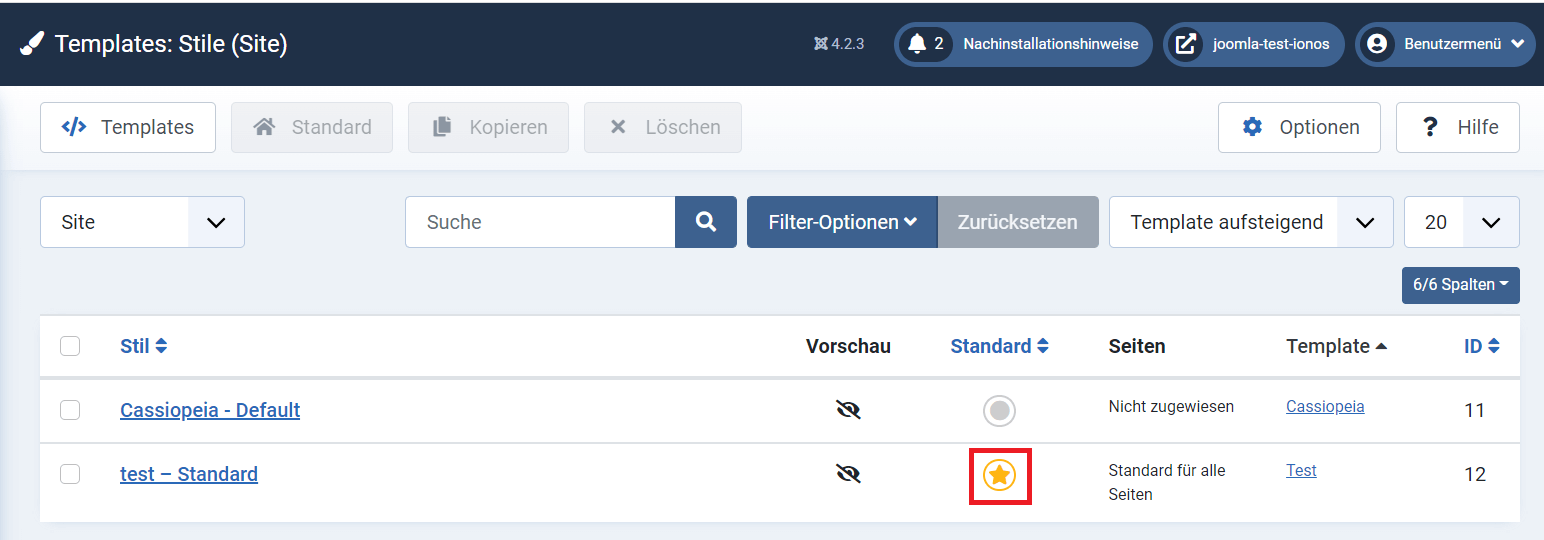
Once the installation of your template is complete, all you have to do isenable. This is also done in just a few clicks in the Joomla backend. Meeting on ” System > Templates > Site template styles “. By clicking on the star button to the right of your template name, you set it as the default template for your site.
Step 4: connect the template to Joomla
It is important to connect your template to Joomla so that the display of your website in its new template works correctly. To do this, you must edit the file index.php. To integrate yourCSS style sheetembed the following line of code at the very top of your fileindex.php :
<?php defined('_JEXEC') or die;
JHtml::_('stylesheet', 'template.css', array('version' => 'auto', 'relative' => true));
?>
php
Step 5: Insert Header Data
In the next step, you need to integrate the header information in your index.php file. For this you can also use PHP. In the file index.phpsimply replace the comment in your header with the following line of code:
<jdoc:include type="head" />html
This way you ask the CMS to enter the relevant header information into your file index.php.
You can then display your template in the test version of your Joomla site:

Step 6: Connect the Modules
The last step concerns editing your content Joomla in your template. You can create multiple new menu items by clicking “Menu > New” in the backend of your site.
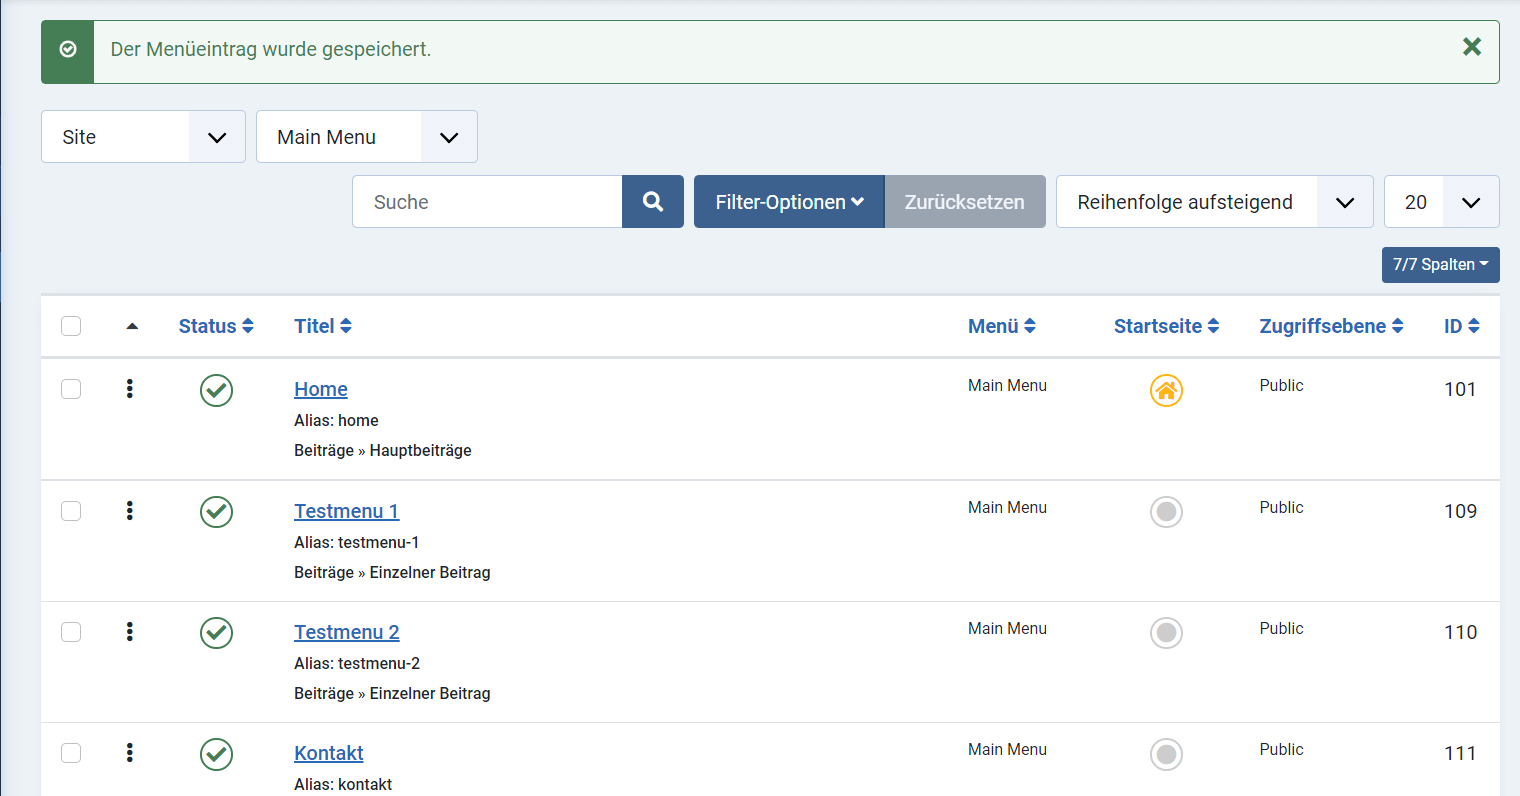
Now navigate to “ System > Extensions > Side Modules » and select the menu you just created. In advanced settings, you can set the module tag. Select the “nav” option.
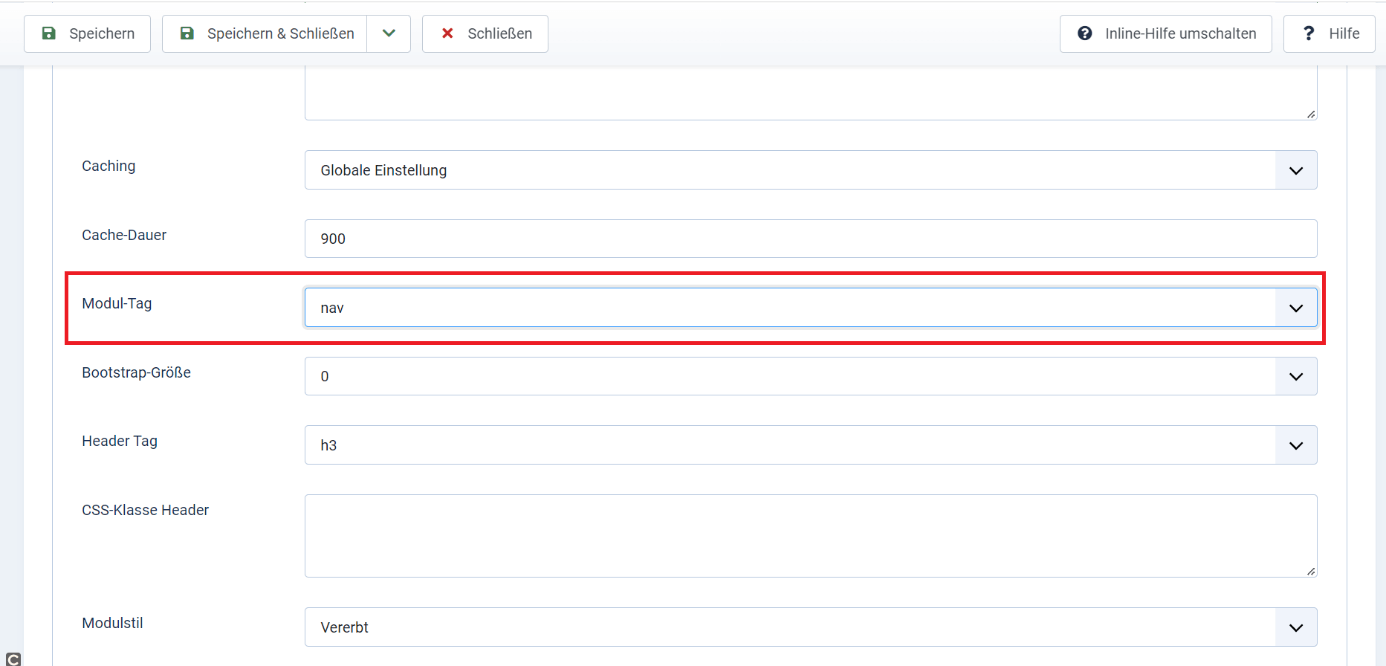
Now in your index.phpreplace the “nav” tag with the following line of code to modify your template accordingly:
<jdoc:include type="modules" name="menu" style="xhtml" />html


