Emails are an integral part of communication in many companies. If you receive too much messages of messages and you can no longer inspect and process the different emails, it may be interesting to allow access to your mailbox, for example to some of your colleagues. They will then be able to integrate your mailbox into their own messaging account and thus consult the incoming emails and treat them if you provided them with the corresponding authorizations.
Note
These instructions are valid for the Outlook version of Microsoft 365, as well as for the Outlook 2021, 2019 and 2016 versions.
Quick guide: Add a mailbox to Outlook
- Open outlook and click on » File ». Below » Account information « , Click on » Add an account And enter the email address you want to share.
- Optional: Select the IMAP email protocol, enter the password for your email account and click on » Connection ».
- Once the configuration is successful, click on » Procedure completed ».
Professional email address
Discover a new way of treating your emails
- Email address to your name
- AI functions to write perfect emails (optional)
- Secure messaging with anti-spam protection
In Outlook, theShared use of the mailbox works for all accounts hosted on a Common Exchange server. So that you can integrate the mailbox from another Outlook account in your own account, you have to First share it. To do this, it is possible to share the entire mailbox or only certain folders. This last option is useful if you only want to share messages from a given address. It is on the other hand possible to grant only a right of reading or to give the possibility of sort Emails, Y answer or of them DELETE independently. After validation, the mailbox Outlook can be added and managed in the context of the rights granted.
Note
Shared mailboxes or individual email files may only appear after a few minutes due to the time necessary for synchronization with the server. So you may have to wait a while before you can integrate them into your outlook mailbox.
Share a mailbox in Outlook
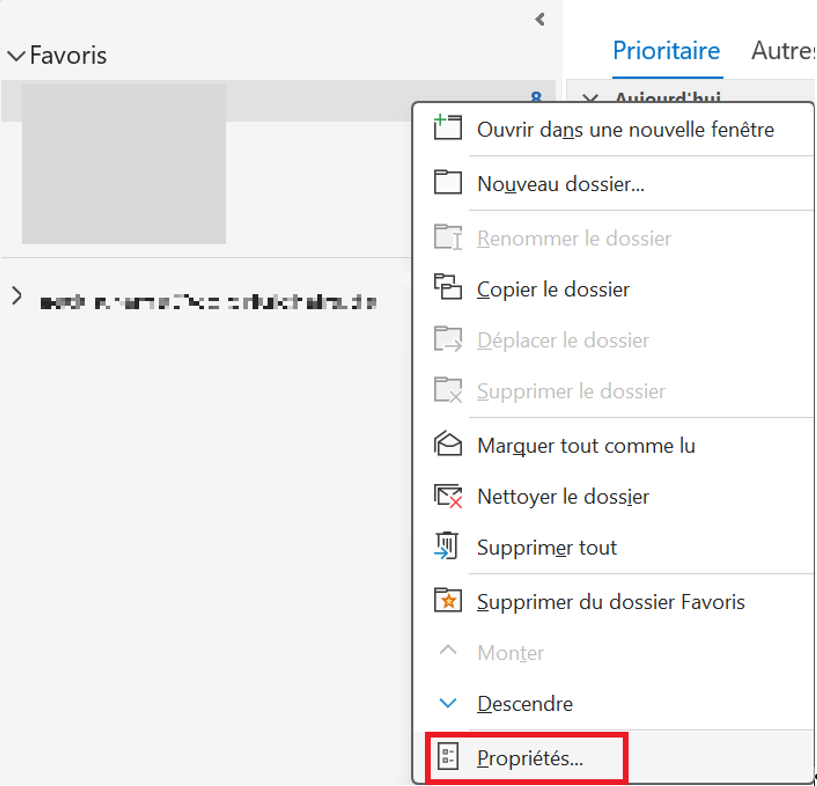
Sharing the outlook mailbox (or a subdossary) with other users on the Exchange server is carried out in a few steps. First of all, you must select the reception box with a right click and choose from the menu which appears the option » Properties « (Outlook on the web: » Authorizations »).
If you prefer to share only some sub-folders rather than the entire reception box, you can individually select those of your choice by accessing the « properties » of the files in question.

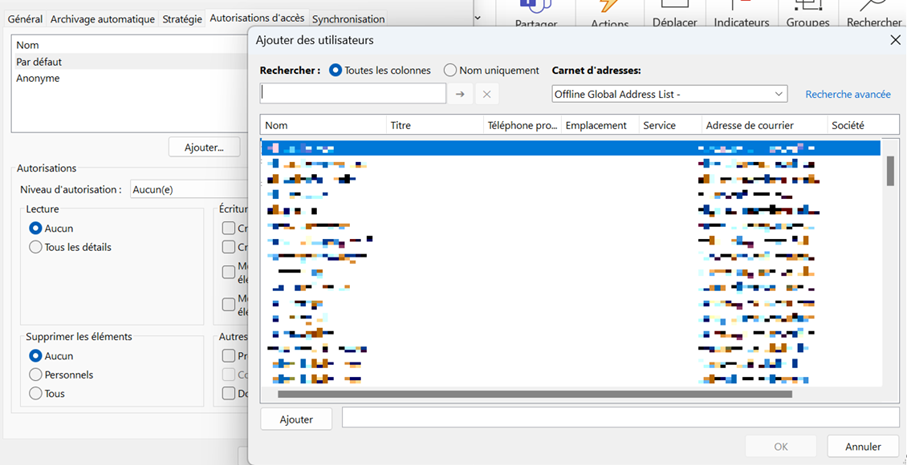
Select the tab » Access authorization « And click on the » Add… ». You can then search the Global Addresses to which the Outlook mailbox account must be added in the overall list.

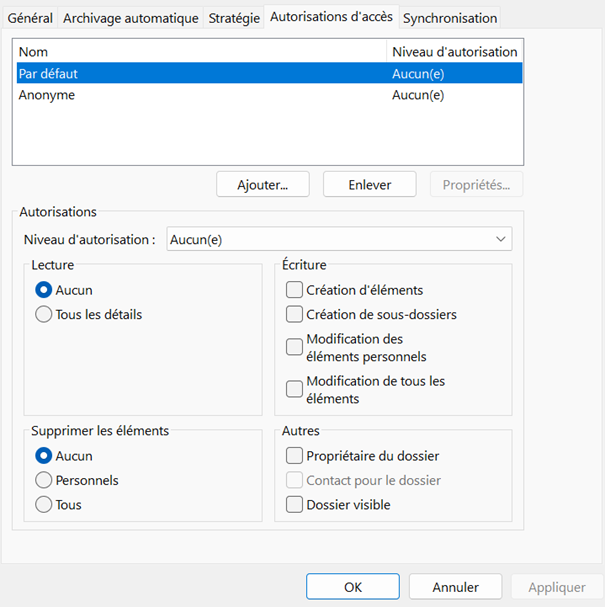
Finally, define the User authorizations For the shared mailbox. With the level of authorization » Owner », It is possible to read all emails, answer them and even delete them. In addition, it is also possible to create new files and subfolders. Click on » OK To accept the defined parameters.

Add a mailbox to Outlook (desktop application)
To add a shared mailbox to Outlook, open the tab » File « And twice click the » Account settings ».
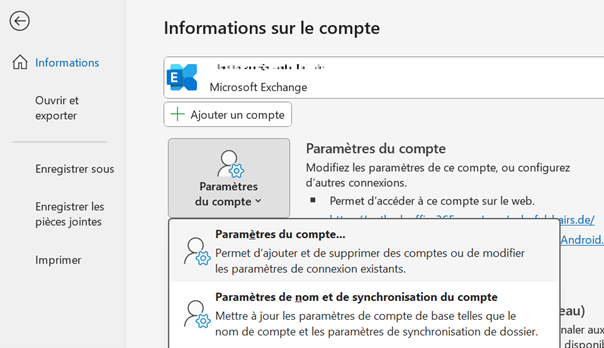

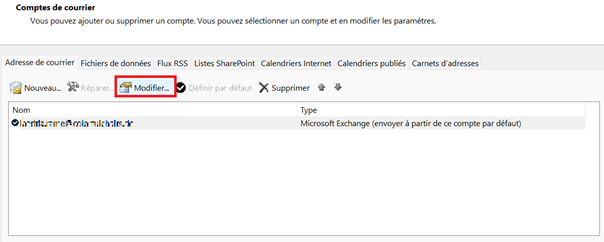
In the list, click on the Outlook account that you want to associate with the shared mailbox, then press » To modify… ». You can also launch the Exchange account settings by double-clicking on the account concerned.

In the next menu, click on » Additional parameters « And go to the tab » Advance ». Press » Add… « , Enter the name of the Shared mailbox and confirm the import by clicking on » OK ».
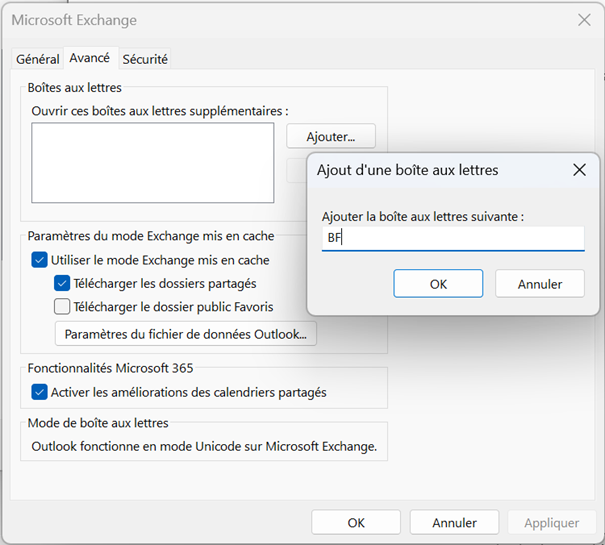

The mailbox should now be displayed in the list of additional mailboxes to open. If this is the case, save the changes by clicking on » Accept ». Finally, click on » OK « , Then on » Following ». Outlook informs you when your account has been successfully updated!
In the folder area, you can now see the outlook mailbox added. If you select it, the customer lists the messages it contains directly in your own account.
Microsoft 365
The office solution you know, even better
- Exchange email box up to 50 GB
- Latest versions of your favorite Office Applications
- Free assistance for installation
Add a mailbox to Outlook Web
In the web version of Outlook, you can also add mailboxes that other users have shared with you before. To do this, connect to your account first in the Outlook web application.
In the left navigation area, right -click the three points of the « folder » tab of the main mailbox. Then select » Add a shared folder ». If you have integrated several email accounts into your Outlook account, you must first select the email account for which the mailbox has been shared.
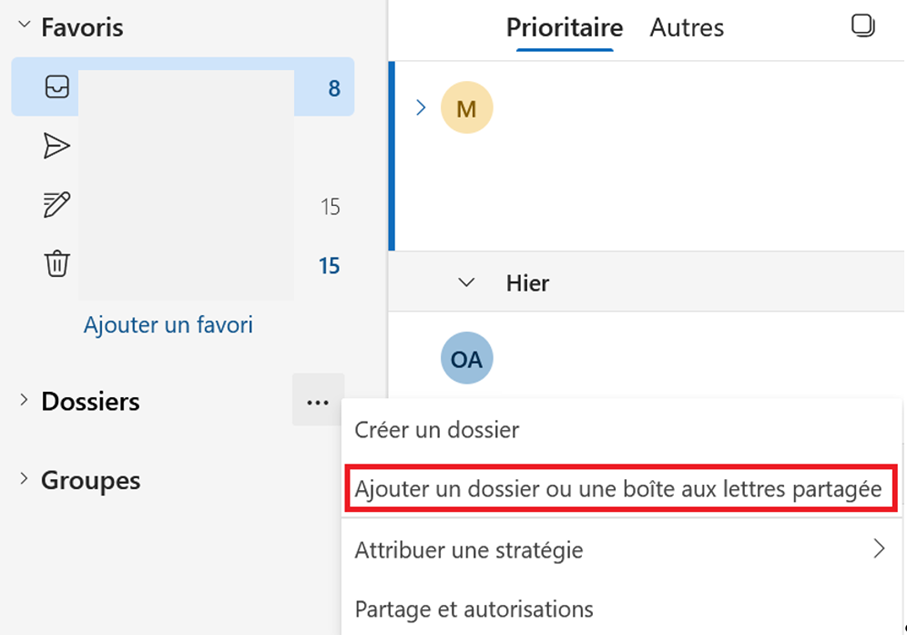

Enter the name or email address of the person you want to integrate the Outlook mailbox and click on » Add ».
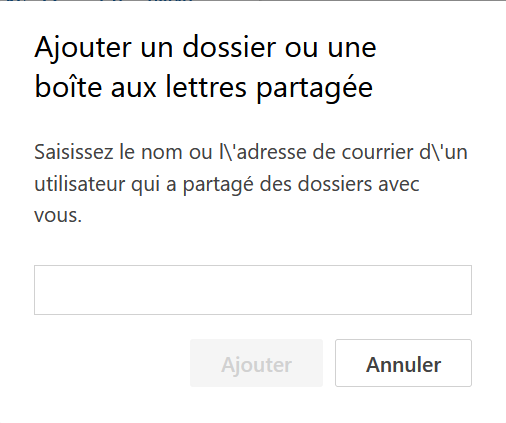

In the overview of the folders, you should now see (under the folders of your own mailbox) an input for the outlook mailbox added.
Why add or share an Outlook mailbox?
It may be useful or necessary, for various reasons, to add to his own account in Outlook a mailbox that belongs to someone else. A frequent scenario is that a manager needs assistance for managing his mailbox and thus grants his assistant the necessary authorizations. Another case of application is the Common management of an email support account : by integrating several users into the outlook mailbox belonging to the company's assistance account, the processing of support requests can be distributed without problem on several shoulders.
Advice
Outlook also allows you to share your Outlook calendar to facilitate the management of appointments with your colleagues or customers.
Finally, it is possible that The mailboxes of former collaborators Be integrated, generally temporarily, in the outlook accounts of people who still work in the company. This can for example be useful to consult the emails exchanged with customers after the departure of an employee, in order to facilitate the transition.
Email Marketing
Create newsletters and generate sales
- Drag and drop and AI functions for an intuitive design
- Many professional models of your choice
- Simple emailing and conforming to the GDPR


