The PuTTY SSH client for Windows uses a different key format than the OpenSSH client. To use PuTTY, you must generate a new public and private SSH key, or convert an existing private OpenSSH key.
The Secure Shell (SSH) protocol allows client authentication through the combination of a username and password, or a key pair including a public key and a private key. This method, which is both reliable and secure, allows the public key to be compared to its private equivalent. It is then not necessary to enter a password as part of the authentication. However, you can take an additional security measure and encrypt the private key using a passphrase.
Prerequisites
- PuTTY SSH client for Microsoft Windows
- Remote server with OpenSSH access
Install PuTTY and PuTTYgen
To convert an OpenSSH key on Windows and then connect to a server using the SSH protocol, you must use the PuTTY client and its accompanying tool, PuTTYgen. You can download these two tools as an installer for Windows through the PuTTY download site.
Once the PuTTY installer for Windows is downloaded, double-click the executable file from your “Downloads” folder and follow the instructions given by the installation wizard. The default settings are suitable for most installations. Once the process is complete, PuTTY and PuTTYgen will normally appear in your Windows programs list.
Use existing public and private keys
If you already have an OpenSSH public key and an OpenSSH private key, copy the private key named “id_rsa” on your Windows desktop. To do this, you can copy and paste the contents of the file or use the SCP client (PSCP, for example) provided when installing PuTTY, or FileZilla.
From the Windows programs list, then launch PuTTYgen.
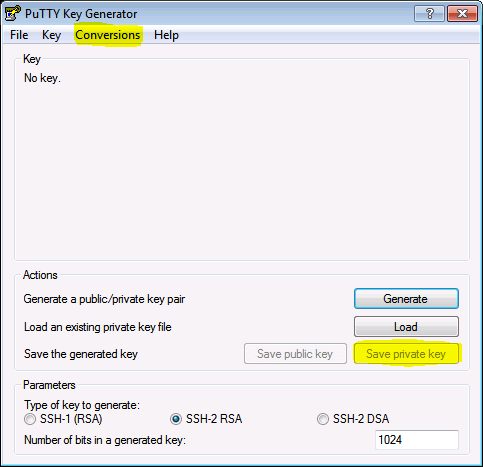
- In the PuTTY key generator menu, click “Conversions” and select “Import key”.
- Access your OpenSSH private key before clicking “Open”.
- Under “Actions” and “Save the generated key”, then choose the “Save private key” option.
- You have the option of choosing a passphrase to protect your private key.
- All you have to do is save the private key to your desktop, using the name “ id_rsa.ppk “.

If the public key is already attached to the “authorized_keys” file on the relevant SSH server, you can use your private key as long as you are connected to the server. Otherwise, you must first copy the public key to the server.
Create new public and private SSH keys with PuTTY
From the list of Windows programs, launch PuTTYgen and follow the steps below:
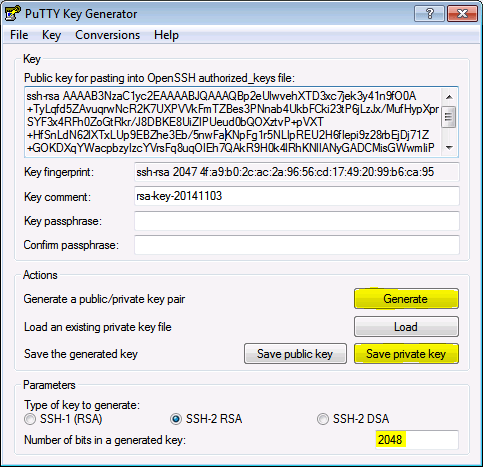
- Under “Parameter” and “Number of bits in a generated key”, increase the number of bits until you reach the minimum value of 2048.
- Under “Actions,” then “Generate a public/private key pair,” click “Generate.”
- The program then asks you to move your mouse cursor in the PuTTY key generator window as a random generator, in order to generate the private key.
- As soon as the key information appears, click “Save the generated key” under “Actions”.
- You can now save the private key to your desktop using the name “id_rsa.ppk”.
- The field under “Key” or “Public key for pasting into OpenSSH authorized_keys file:” contains the public key.

Copy public keys to the server
The public SSH key can be found in the “Key” field, under “Public key for pasting into OpenSSH authorized_keys file:”. The public key name begins with “ ssh-rsa ”, then comes a string of characters.
- Select the entire public key in the PuTTY key generator, and copy the text.
- Launch PuTTY before connecting to the corresponding remote server using your credentials.
- Then use the text editor of your choice to create and/or open the file authorized_keys (keys allowed):
vi ~/.ssh/authorized_keys- Paste the public key already copied into the file authorized_keys (keys allowed).
ssh-rsa AAAAB3NzaC1yc2EAAAABJQAAAQBp2eUlwvehXTD3xc7jek3y41n9fO0A+TyLqfd5ZAvuqrwNcR2K7UXPVVkFmTZBes3PNnab4UkbFCki23tP6jLzJx/MufHypXprSYF3x4RFh0ZoGtRkr/J8DBKE8UiZIPUeud0bQOXztvP+pVXT+HfSnLdN62lXTxLUp9EBZhe3Eb/5nwFaKNpFg1r5NLIpREU2H6fIepi9z28rbEjDj71Z+GOKDXqYWacpbzyIzcYVrsFq8uqOIEh7QAkR9H0k4lRhKNlIANyGADCMisGWwmIiPJUIRtWkrQjUOvQgrQjtPcofuxKaWaF5NqwKCc5FDVzsysaL5IM9/gij8837QN7z rsa-key-20141103- Save the file, then close the text editor.
- Then change the file permissions “ authorized_keys (keys allowed) so that the file does not grant group write access.
chmod 600 ~/.ssh/authorized_keys- You can now disconnect from the remote server.
Connecting to the server with a private key
You can now test how SSH key authentication works. To do this, close PuTTYgen and relaunch the PuTTY client.
- Under “Session”, fill in the host name or IP address of the corresponding remote server.
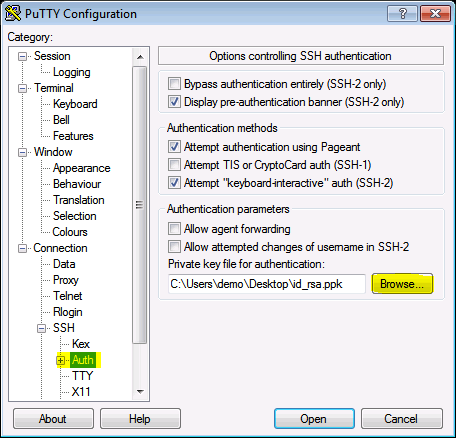
- Follow this path: “Connection” > “SSH” > “Auth”.
- Under ‘Authentication parameters’, then ‘Private key file for authentication’, click ‘Browse’.
- Look for the private key “id_rsa.ppk”; when you find it, click “Open”.
- Finally, click “Open” again to connect to the remote server using key pair-based authentication.


