You can equip your server with its own domain. This way, servers are more easily found. For game servers such as the Counter Strike 2 server, having your own server is an attractive option.
What are the prerequisites?
In order to assign a domain to your CS2 server, you first need a Counter Strike 2 server functional. You can configure it on Windows or Linux by installing the appropriate software and freeing the necessary ports.
If you have not yet installed your own CS2 server, our instructions will be useful to you:
So that your server can run on a domain and can be found by other players via domain name, you must have your own domain. A domain provider like IONOS allows you to register the domain name you want in just a few clicks.
Your own .fr domain!
Stand out with a unique domain name and personalized email address!
Simple
Secure
24/7 support
There are many domain extensions to choose from. In addition to the more well-known generic top-level domains, game servers often use so-called new domain extensions. These are for example:
- .team
- .community
- .gg
- .games
How to install a CS2 server domain, step by step?
If you want your Counter Strike 2 game server to be findable via your domain name, you must link to your domain. To do this, among other things, you must create new DNS records. If you have already used your domain in another setting, for example for another server or your own website, this is not a problem. You can simply reuse it for your CS2 server.
View data from your CS2 server
Firstly, it is essential to know where exactly does your Counter Strike 2 server work?. To do this, you need an IP address and a free port on your server.
In our example we show how to link the domain to your server in your IONOS account. If your server is hosted by another host, the GUI may differ from what is shown here. Adjust the corresponding steps accordingly.
To preview your CS2 server data and save it for later use, log in to your IONOS customer account and navigate to the “Servers and Cloud” section. Select the server you are using for your game server from the list. The IP address is then displayed directly.

To connect your CS2 server to a domain, you need a port and an IP address. These can be found in the “Network” section, on the left of the screen when navigating to the “Firewall Policies” tab. The server and free port are then displayed here.

Access the domain menu and DNS options
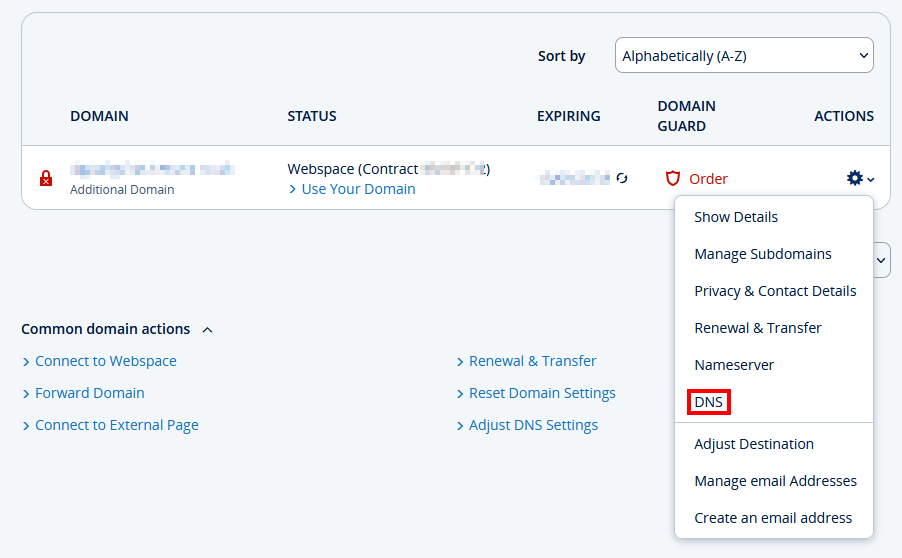
The next step is to access the Domain DNS options that you want to assign to your CS2 server. To do this, navigate to the “Domains and SSL” section of your customer account. A list of all domains is displayed. Select the domain you want to use for your CS2 server domain from the list. Click the gear icon and select « DNS » from the drop-down menu that opens to access DNS settings.

Create a DNS record
As we mentioned above, it is essential to define a DNS record (in the DNS settings) for your domain to connect to your Counter Strike 2 server.
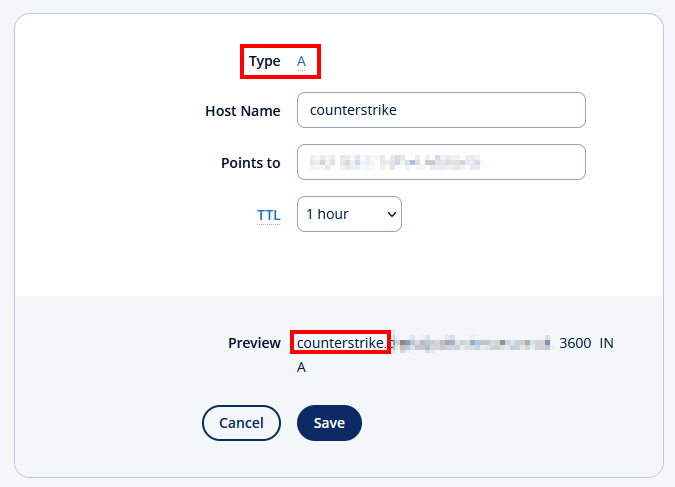
You must then create what is called a A-Record. The « A » here stands for « Address » and is the most basic type of DNS record: it indicates the IP address of a given domain. To create an A record, click the “Add Record” button. Then select an A-Record as the recording type from the list. You must enter three parameters when creating an A record:
-
Hostname : By assigning a hostname, you can create a subdomain for your CS2 server. Enter for example “counterstrike” and the address
counterstrike.example.orgwill be created. If you only use your domain for Counter Strike, you can also enter a wildcard character in the form of @. The server will then be accessible at the addressexample.org. - Points to : Enter the IP address of your Counter Strike 2 server here.
- TTL : The TTL defines how often the Domain Name System (DNS) checks the DNS record and makes changes. The shorter the delay, the quicker the changes are taken into account.

Establish a connection between client and server
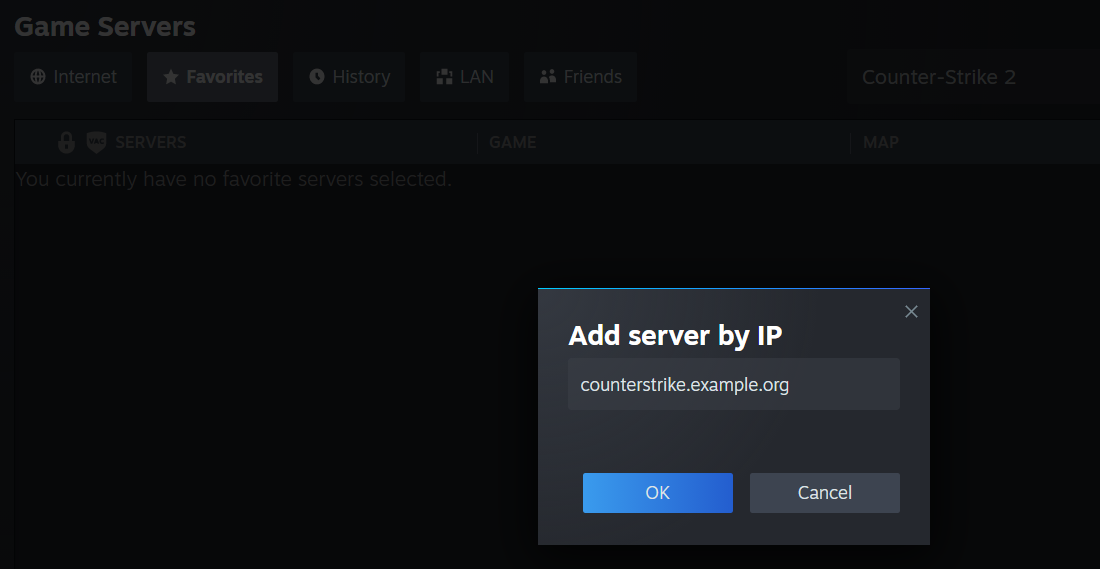
For this last step, you and your teammates must connect to the CS2 server on which the domain will be used. Instead of typing your IP address, you can now type the name of the created domain.


