Windows gives you the option to manually change the DNS server. This can be done directly in Microsoft’s operating system or in your router settings. Alternate servers for the Domain Name System (DNS) may be more suitable for your needs.
How to change DNS server in Windows 10?
If you are using Windows 10, you can change the DNS server in the » Network connections « .
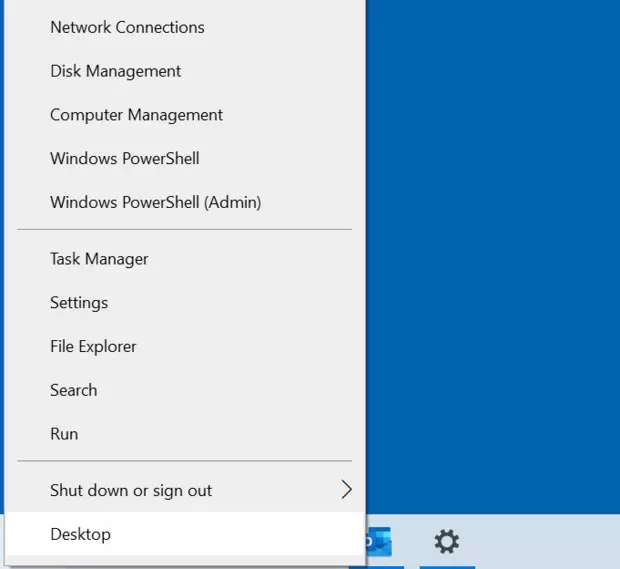
Step 1 : open the network connection settings by clicking on the windows-logo with the right mouse button and then on the corresponding menu option.
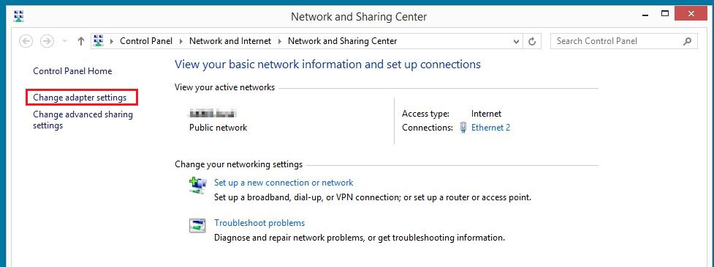
2nd step : you are now on the established connections status page. Under « Change your network settings », tap » Change adapter options « .
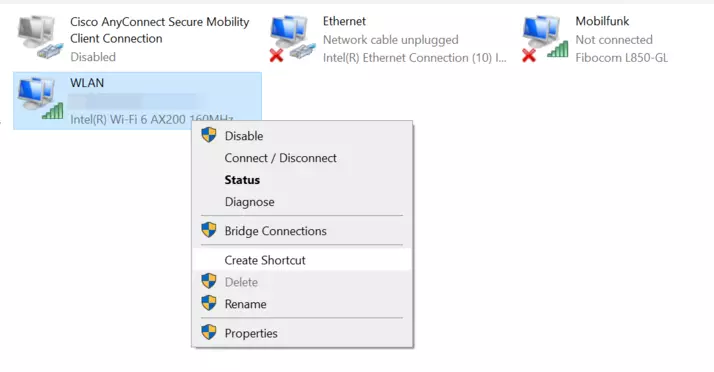
Select from one right click the connection for which you want to change the DNS server. For desktop computers, the connection is most often made through a network cable, in which case “Ethernet” must be selected. If your device is connected to the network Wireless, select “Wi-Fi”. In the window that opens, click » Properties « .
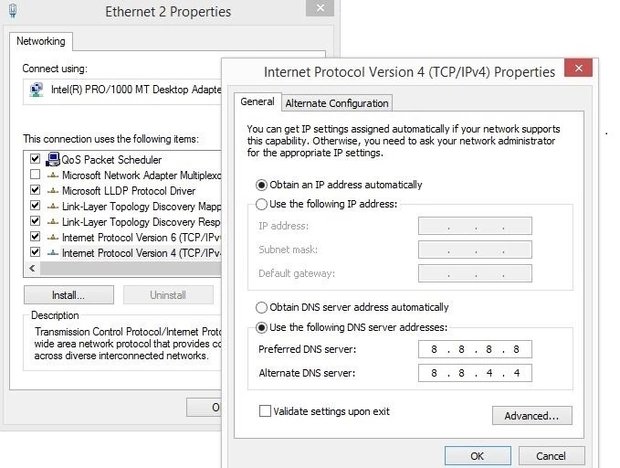
Step 3: double click on the command Internet Protocol Version 4 (TCP/IPv4) » and activate the option « Use the following DNS server address « . Enter the two Google server addresses (8.8.8.8 and 8.8.4.4).
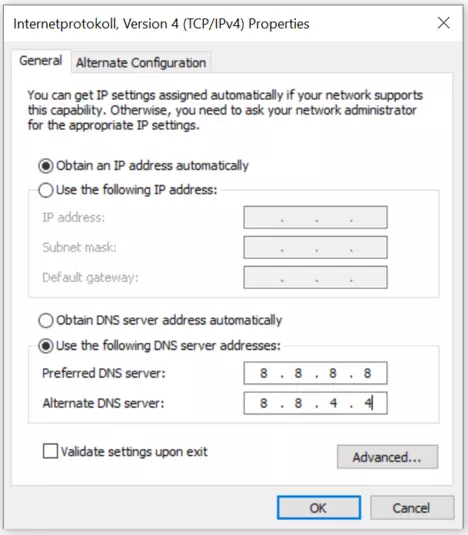
Step 4: to validate DNS server changes in Windows 10, click the OK button.
DNS server settings in Windows 10 can also be done by command prompt. To do this, enter the following commands:
netsh interface ip add dns name= »connection name“addr=8.8.8.8 index=1
netsh interface ip add dns name= »connection name“addr=8.8.4.4 index=2
Instead of the « Connection name » formula, enter the names corresponding to the LAN or Wi-Fi connections of your choice.
How to Change DNS Server in Windows 8
Windows 8 users can also change the DNS server in Network Settings.
Step 1 : open the window Network and Sharing Center. To do this, go either through the control panel (“Start menu” -> “Control panel”), or through the Network icon in the information field of the taskbar. When you find it, right-click on it, and select the “Open Network and Sharing Center” option.

2nd step : open the option » Manage network connections by clicking on the corresponding button.
Step 3: open the connection to configure with a right click. Select » Properties « .
Step 4: then double-click on the “Internet Protocol Version 4 (TCP/IPv4)” option. This opens the menu for changing DNS servers in Windows 8, where you just have to enter the already mentioned addresses of Google’s DNS servers (8.8.8.8 and 8.8.4.4).
Change DNS Server in Windows 7
Changing the DNS server in Windows 7 is done through the network connection settings.
Step 1 : start by opening the Network and Sharing Center. To do this, either go through the Control Panel, which provides access to the corresponding menu, or right-click on theNetwork icon in the information field of the taskbar (System Tray), then open the option » Network and Sharing Center « .

2nd step : select in the following menu the command » Change map settingsthen the connection for which the DNS settings need to be changed.
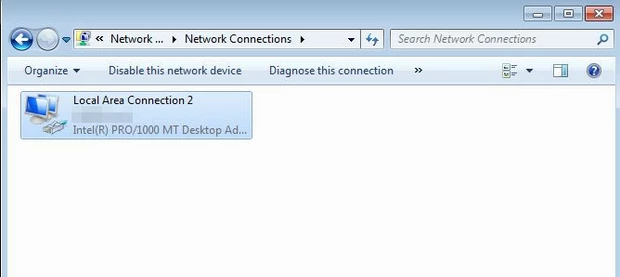
Step 3: for the desired connection, click with the right mouse button on the » Properties to access the Local Area Connection Properties window. In this window, go to the option “ Internet Protocol version 4 (TCP/IPv4) », and open it by double-clicking on it. This allows you to change DNS server in Windows 7.
Step 4: the last step is the setting in “Use the following DNS server address”. You must enter the addresses of the two desired public servers:
Preferred DNS server: 8.8.8.8
Alternate DNS Server: 8.8.4.4
Change DNS Server in Router Settings
Instead of changing the operating system, you can also change the DNS server in your router. The advantage is that all devices connected to your network (e.g. Wi-Fi network) then use the desired DNS server and do not have to be configured individually. The way you adapt the DNS server depends on your router. Most devices, however, can be managed through an in-browser interface. You will find a URL or an IP address in the user manual or on the router, which you can enter directly into the address line of the browser. All you have to do is enter your access data (which can be found in your documentation) and then look for the domain name system settings in the menus.
It is also possible to change the DNS server in other operating systems:
What are the benefits of changing DNS server?
When you connect to the Internet through your router, the DNS server settings are automatically loaded. Typically, your ISP handles name resolution. So you don’t need to worry about the configuration. Simply connect the router to the desired devices; protocols such as DHCP then assign the necessary connection information.
This is actually a good principle, but alternatives in DNS may be more appropriate. It may be useful or necessary to change DNS server by default, especially for three reasons following:
- Speed : another DNS server may provide a speed advantage, allowingspeed up loading times. Name servers OpenDNS and the Google’s public DNS serversreputed to be particularly fast, are very popular.
- Accessibility: if the error message « DNS server is not responding » appears instead of a website, it means that the standard server for name resolution is down. Most of the time it is a temporary problembut you can fix it immediately by changing DNS server.
- DNS blocking: the DNS can be used for the purposes of censorship. Internet service providers then block name resolution for certain domains. By choosing another DNS server, you bypass the blocking.


