Taking screenshots in Steam is very easy, but finding them after the game is a whole different matter. We walk you through the different options for accessing screenshots and how to change where screenshots are saved.
How do I take a screenshot in Steam?
Steam is one of the most popular platforms for downloading and playing the latest in video games. Sometimes we would like to save a precise scene of a game in the form of a screenshot. Steam has this convenience of integrating this feature out of the box, so you don’t need another screenshot tool. In Steam, so just press [F12] for that. A small Steam notification area informs you that the screenshot was successful.
But finding the screenshot later is unfortunately not that easy. We present you two methods to find your screenshots.
You can configure your game sessions as you wish with your own game server. Playing in community with other users is therefore no problem. At IONOS you can rent a game server.
Option #1: View screenshots in the Steam app
The easiest way to access game screenshots is to go through the Steam application itself. You can also view their location on your computer. Proceed as follows for this purpose:
- Select « Preview » in the top menu bar, then « Screenshots ».
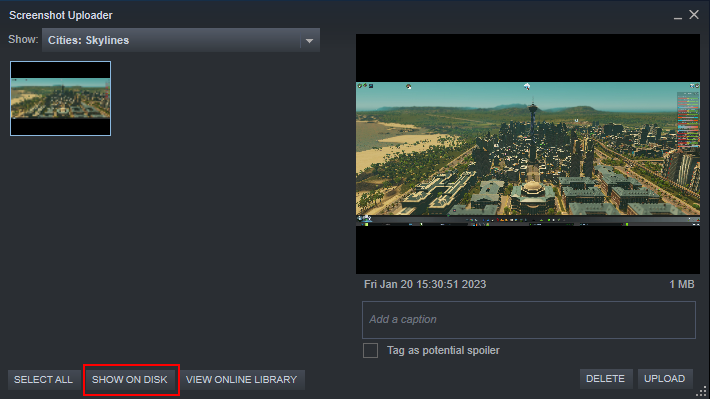
- A new window for managing screenshots is displayed.
- Click on the game in which you took the screenshot you want to see.
- Then click on the “Show on Disk” button below. The location of all screenshots for this game will then open.

Option 2: Find the Steam screenshots folder on the computer
The second way to find screenshots taken with Steam is through their location on the computer. If Steam’s default settings are active, screenshots are stored in a subfolder of the Steam program folder. It is just as easy to access it.
To find screenshots on a Windows-PCopen Explorer and, if you installed Steam in the default path, enter the following path in the Explorer input bar:
C:\Programm Files (x86)\Steam\userdataYou will now observe the folders of all users who use Steam on this computer. Folders are named with different number combinations. These are the users’ respective Steam IDs. Open the folder containing your Steam ID, then successively the “760” and “Remote” folders. This folder contains additional subfolders allocated to the various games in which you have taken screenshots. Here, the numerical combinations correspond to the Game IDs respective. Open your game folder, then open the « screenshots » folder.
If you use Steam on macOS and so you have taken screenshots on Mac, you can take a similar approach to find their location. You’ll find the generic Steam folder under « Users » > « (your username) » > « Library » > « Application Support » > « Steam ». Then proceed as described above, then click through the various folders from the Steam ID to the Game ID and finally to the steam screenshots folder.
How do I change the location of the screenshots folder in Steam?
If you want to access your screenshots regularly and don’t want to go through that complicated path every time, you can change thelocation of screenshots in the Steam app. It works like this:
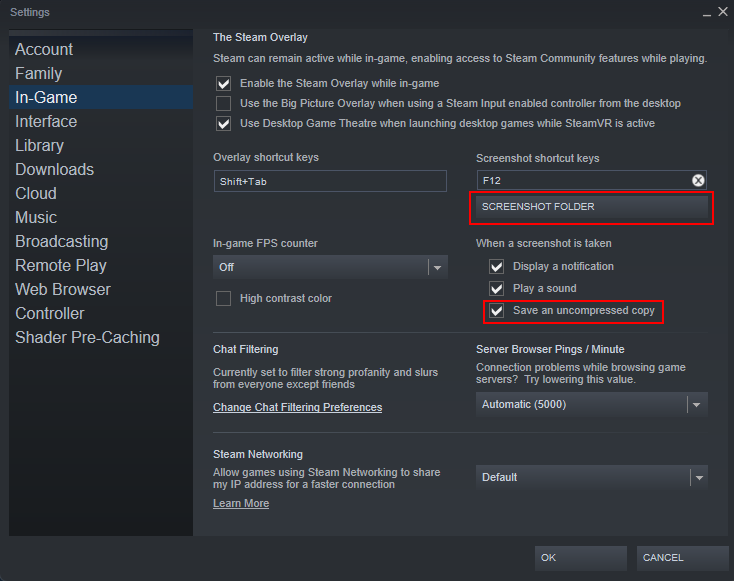
- Click « Overview » in Steam’s top menu bar, then click « Settings. »
- In the window that opens, select the « In-game » menu item.
- You can change the save location on the right side. Click « Screenshots Folder », then select a new folder to save the screenshots.
- Check the box « Keep an uncompressed copy », then click « OK ».
The screenshots will now be saved in the folder you selected.

You can additionally define a personal keyboard shortcut for taking a screenshot in this menu. [F12] is configured by default. Enter your keyboard shortcut in the « Screenshot Shortcut » box.
Browse the Digital Guide for more articles around Steam. Have you ever bought a game that turned out to be less interesting than you expected? Steam’s refund option lets you easily return misguided purchases. Steam’s Family Sharing option is also a handy feature: it lets you share your game library with other people.


